Appearance
User Manual for Newline NFCMP
1. Account registration
1.1 Create a new account with your email
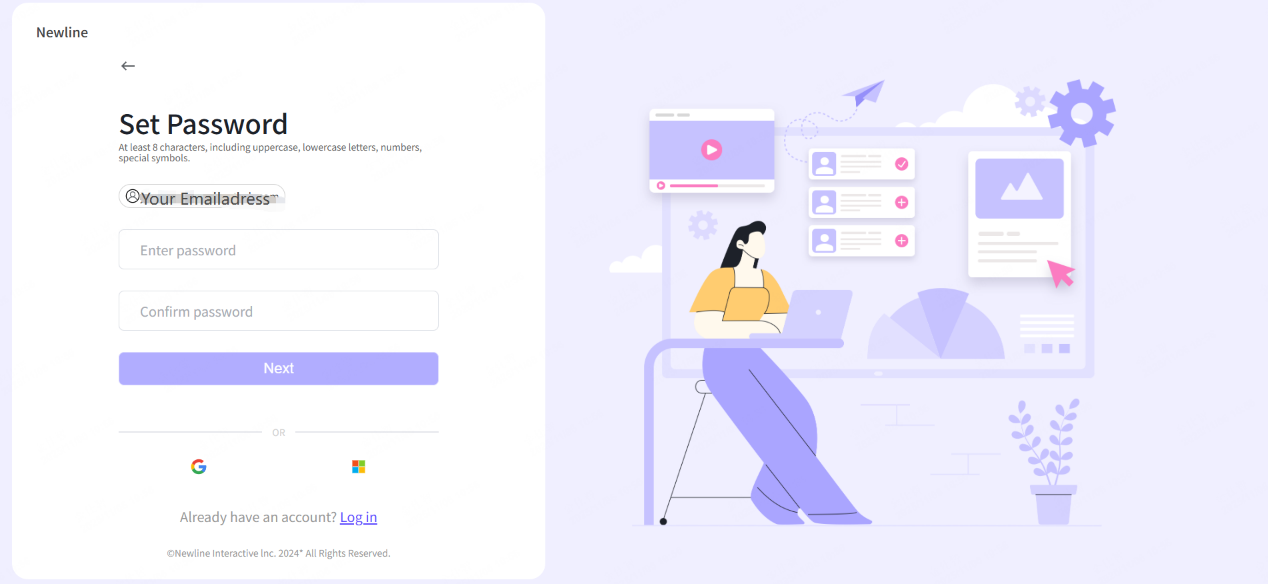
You can simply use your email to start the new account to access the newline NFCMP. Just fill in the email address and then click the next step button to confirm other details for your account.
Step 1: Type in your Email, and then click sign up.

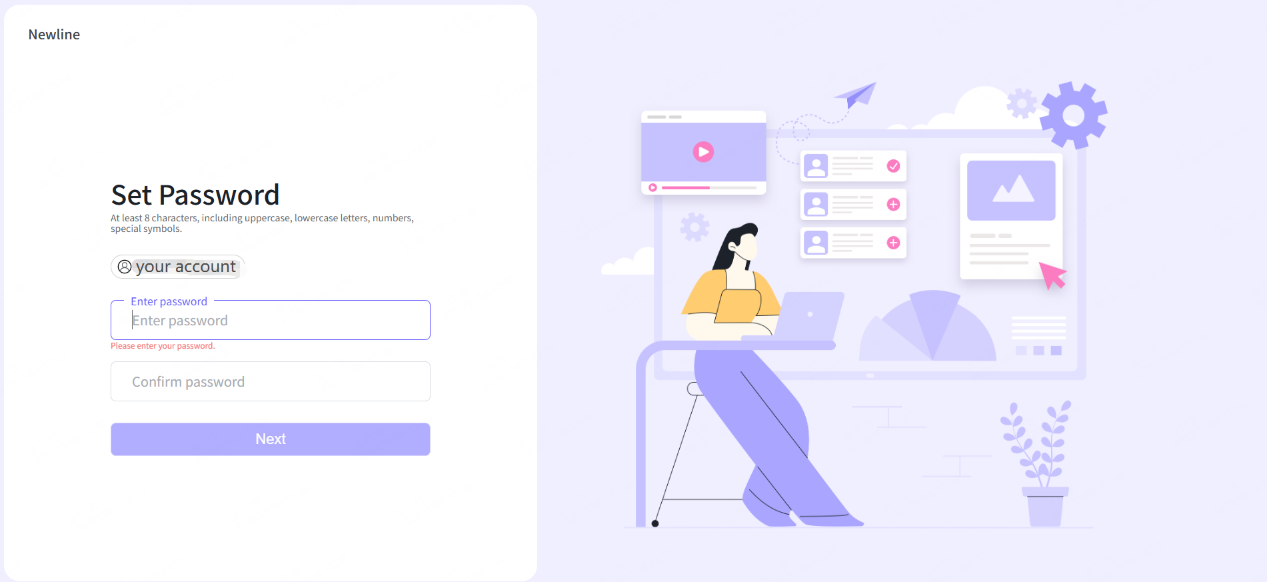
Step 2: Confirm your password.
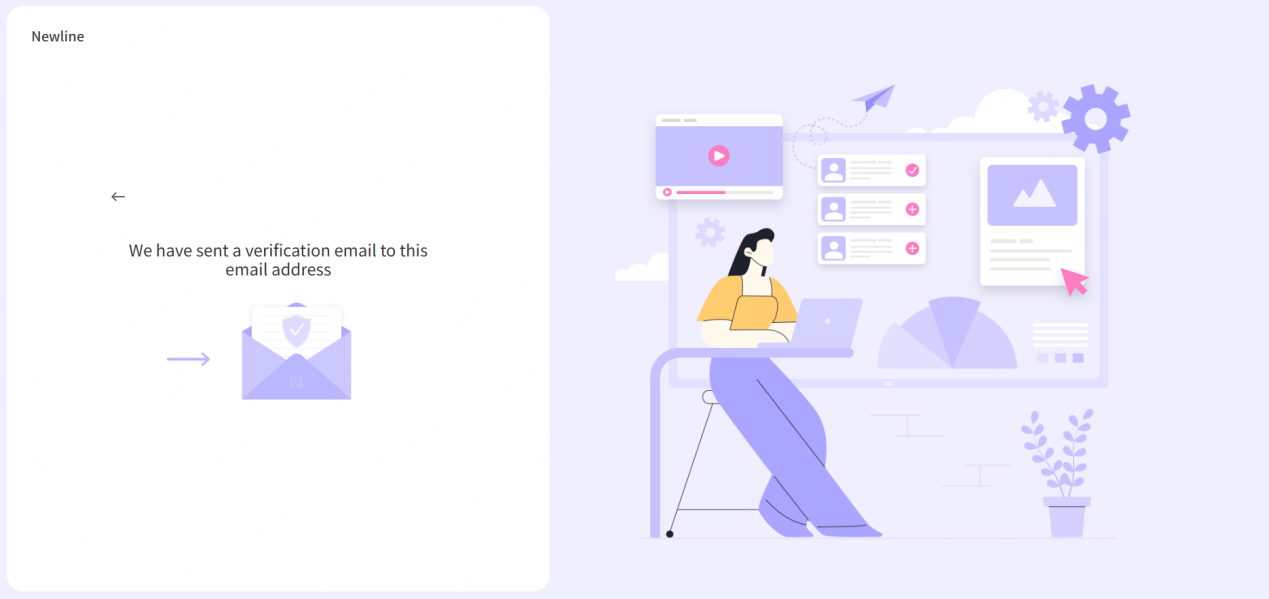
Step 3: Verify by the Email.
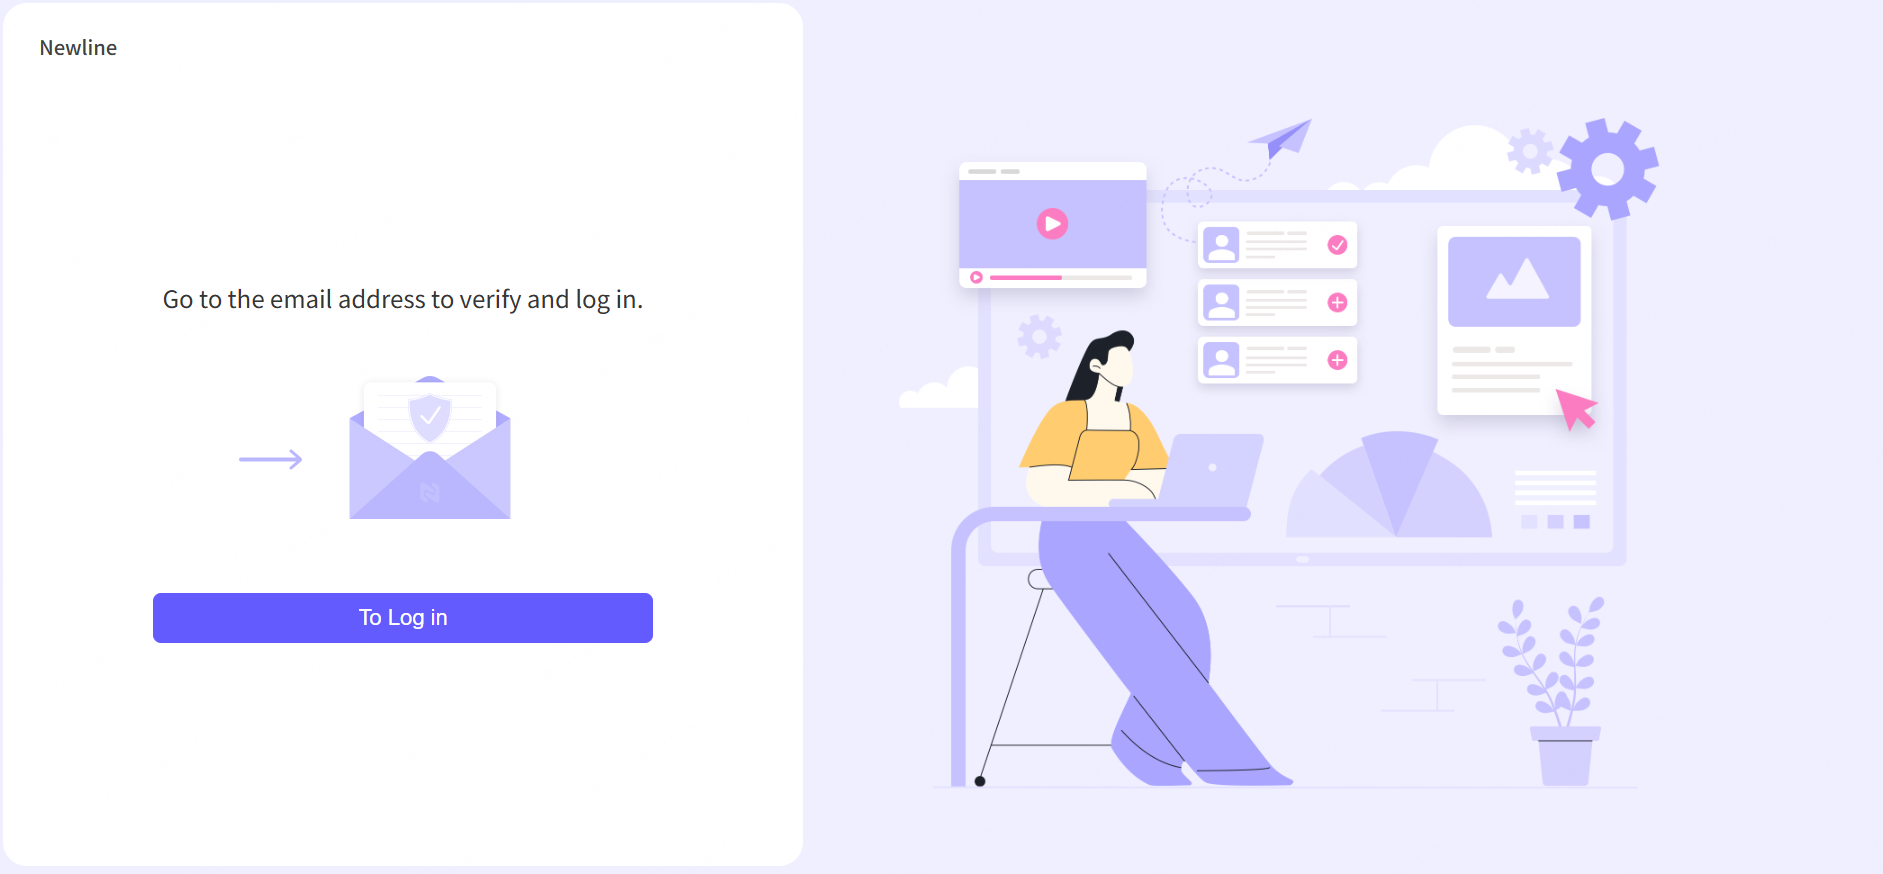
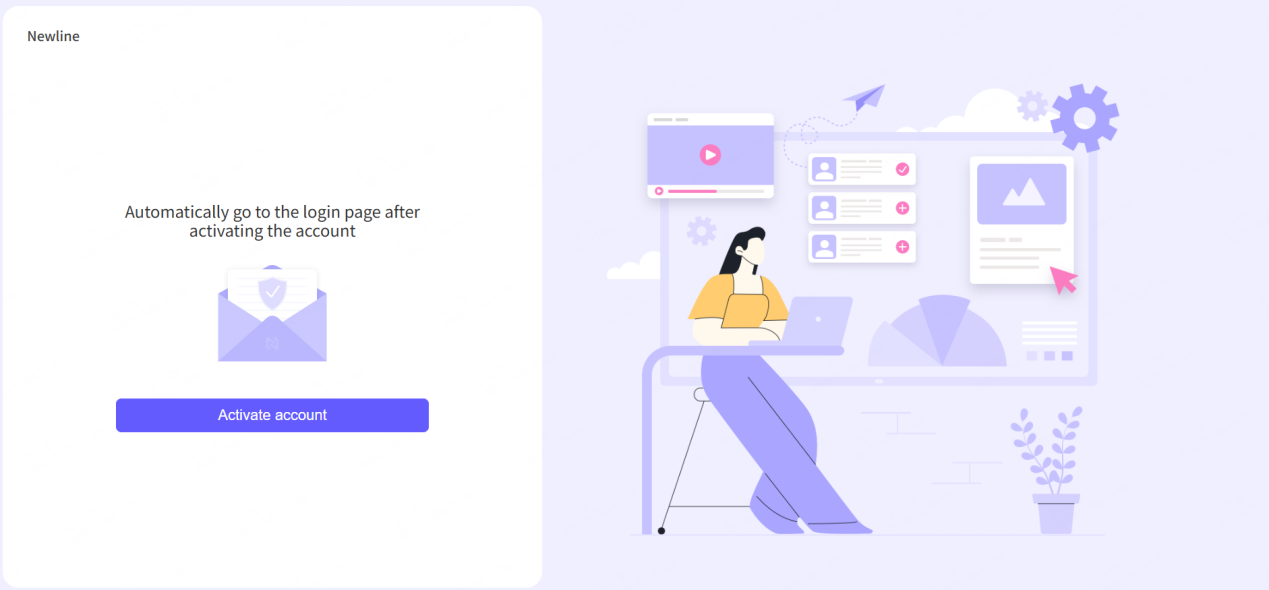
Step 4: Click the link in the Email and then activate the account.
And then you can switch to the setting of your account, continue to do the work for the personal setting.
1.2 Single sign on
Get a quick started by your Google account or Microsoft account.
Step 1: Click the SSO choice and login your Google/Microsoft account.
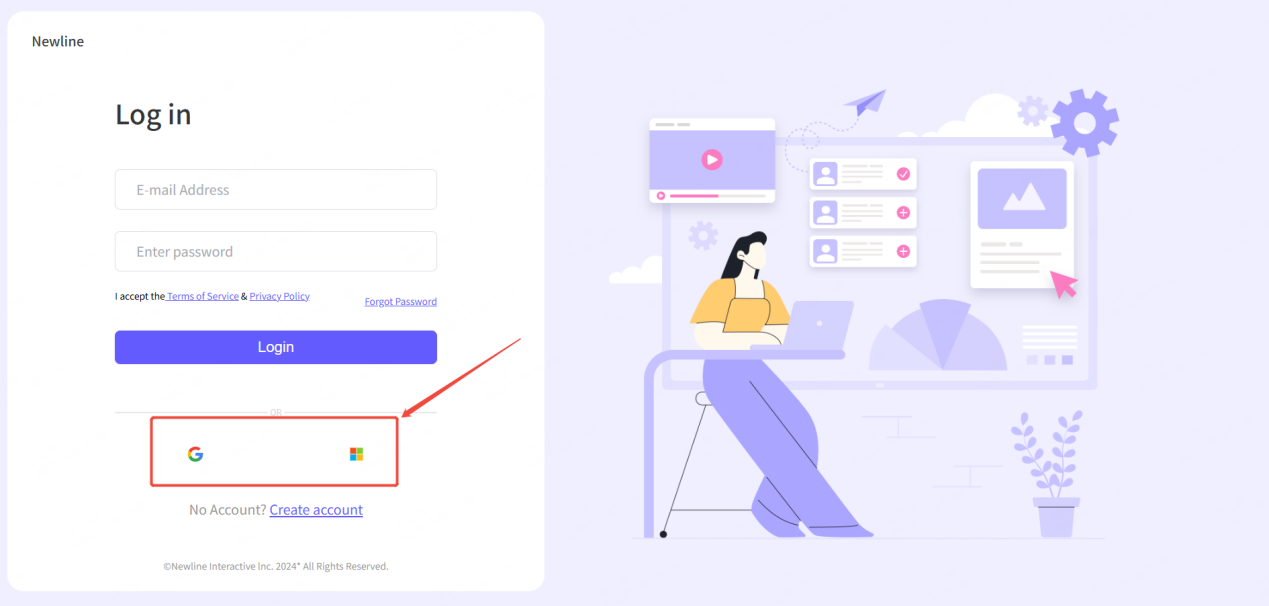
Step 2: Verify by the Email.
Step 3: Confirm your password, and then you can login the portal.
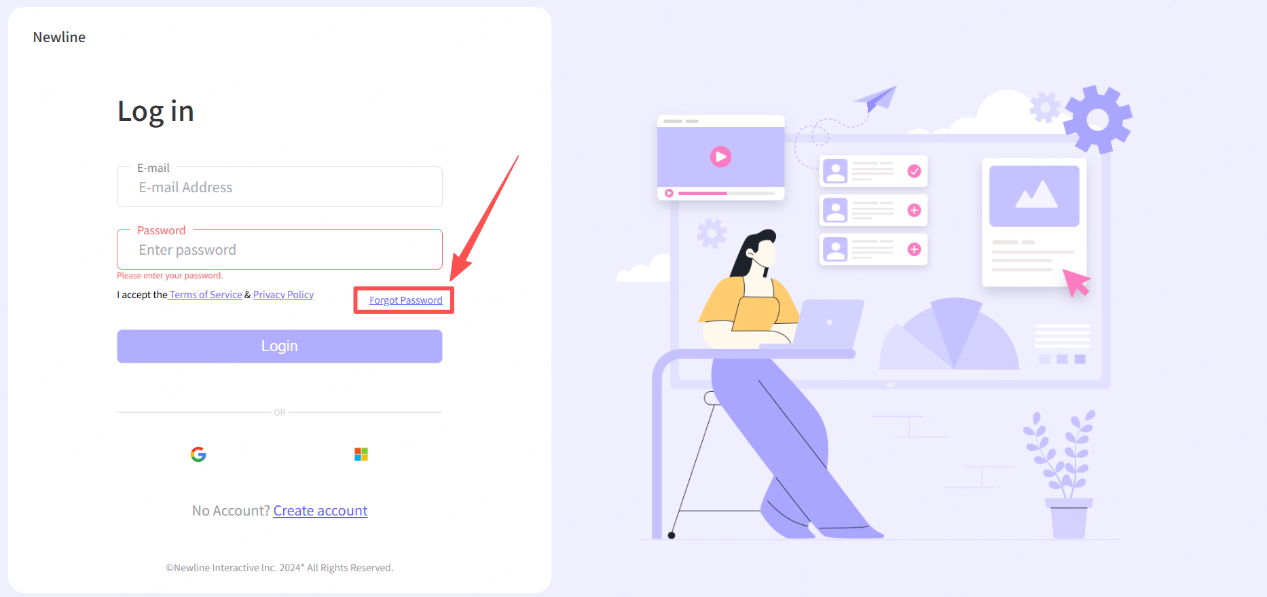
1.3 Reset password
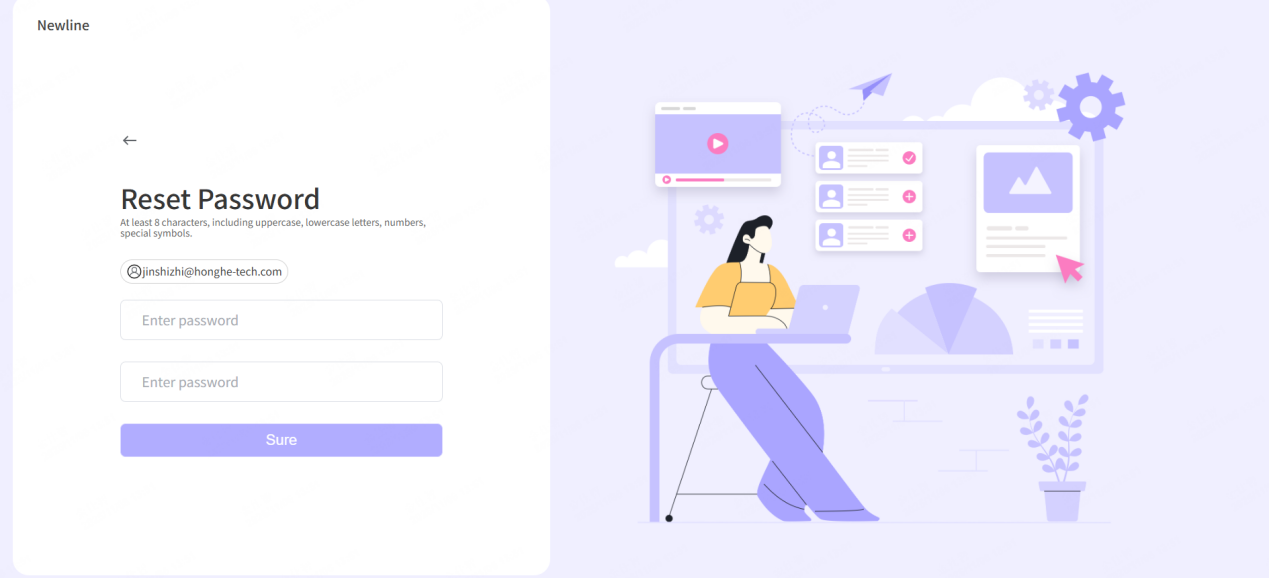
If you had forgot your password, you can try to reset the password by the Email.
Step 1: Click the forgot button.
Step 2: Type in your Email address.
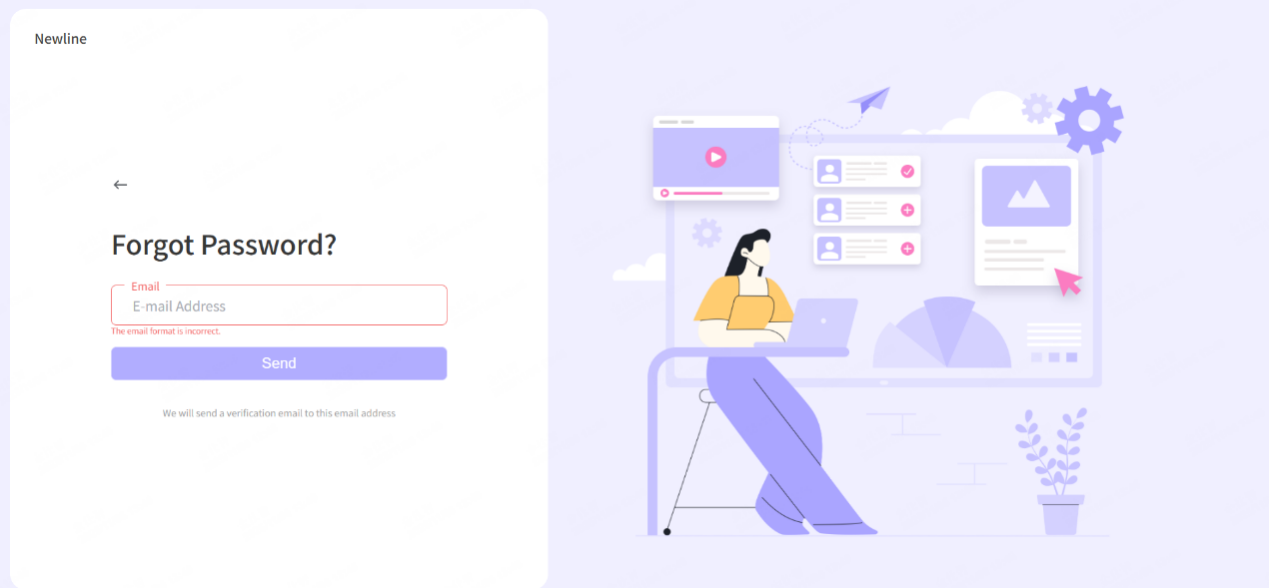
Step 3: The reset link will send to your Email address.
Step 4: Reset your password.
2. Dashboard
2.1 Home page
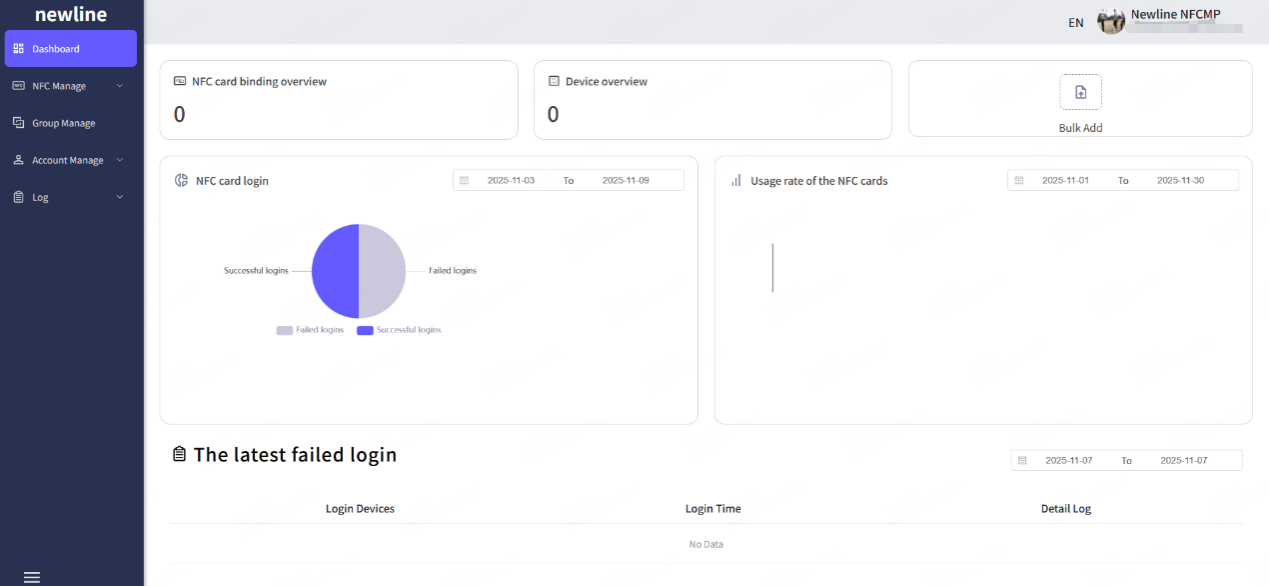
In the Dashboard, you can get the whole situation by the key data, such as the total sum of NFC cards, devices, and the total sum of card logins, latest failed logins.
3. NFC Manage
3.1 NFC card binding
In order to manage your card, you need to binding your NFC card first.
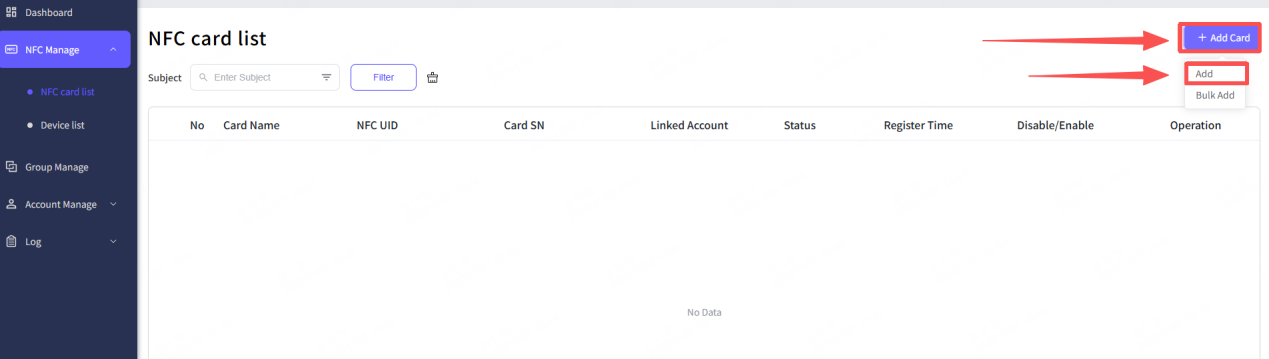
“Add” mode, binding one card at a time.
Step 1: Click “Add Card” button, choose “Add” option.
Step 2: Choose the methods by the “Card SN” or “NFC UID”.
(Please note that the 'Card SN' is a unique number for each Newline standard NFC card. As for the 'NFC UID', this is the standard NFC protocol ID, which is unique to each NFC standard card.)

Step 3: Type in the right number for which methods you chose.
Step 4: Type in the name for your card.
Step 5: Choose an account that link to your card, you can also select it later.
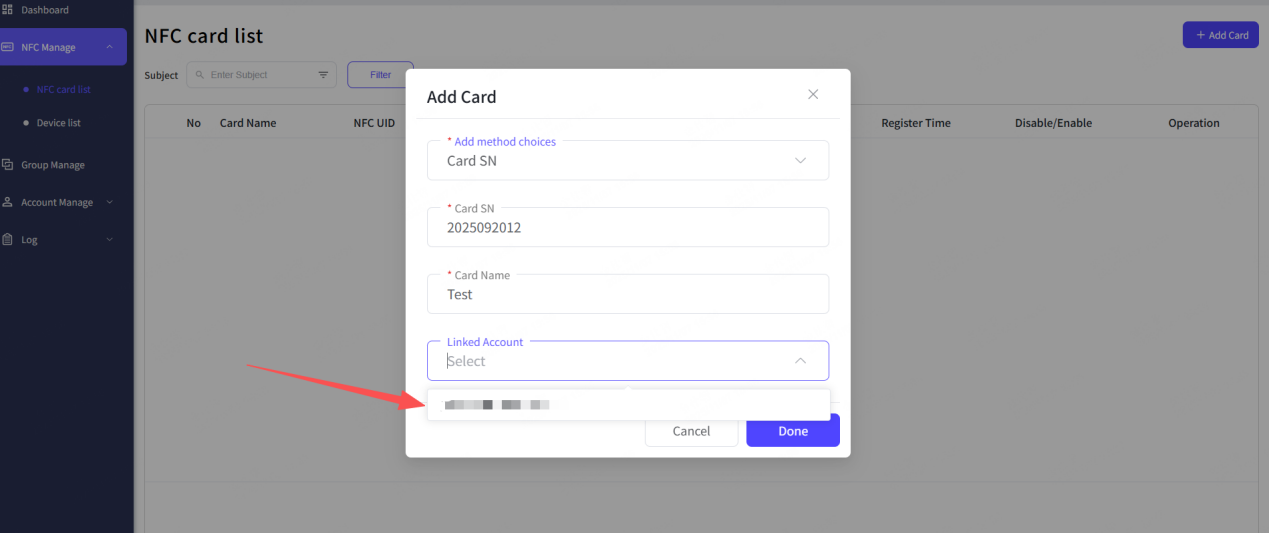
Step 6: Click “Done” button.
Step 7: The hint shows up, it means you had successfully added your card. And you will see your card in the card list.
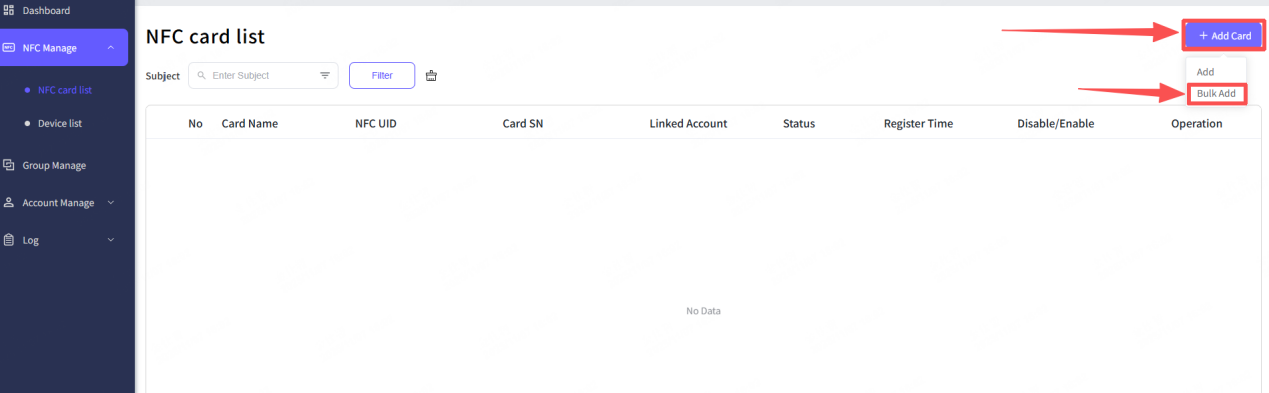
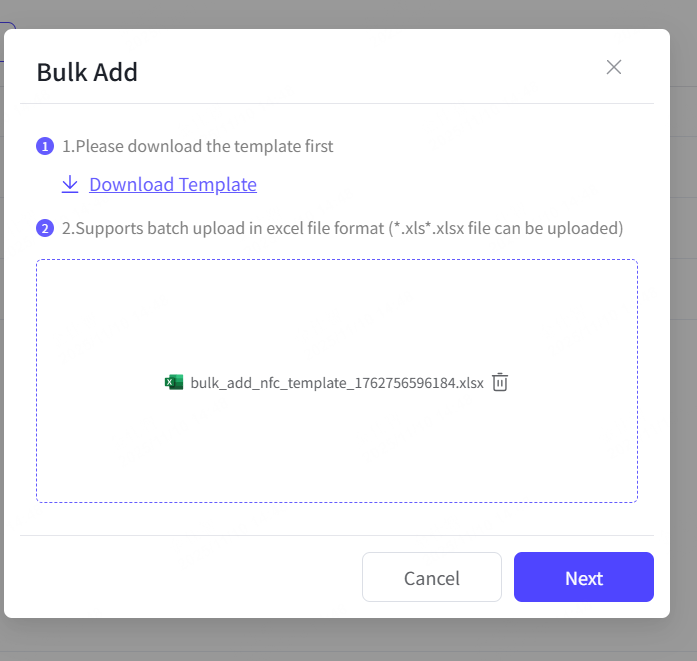
“Bulk Add” mode, binding multiple cards at a time.
Step 1: Click “Add Card” button, chose “Bulk Add” option.
Step 2: Download the template file.
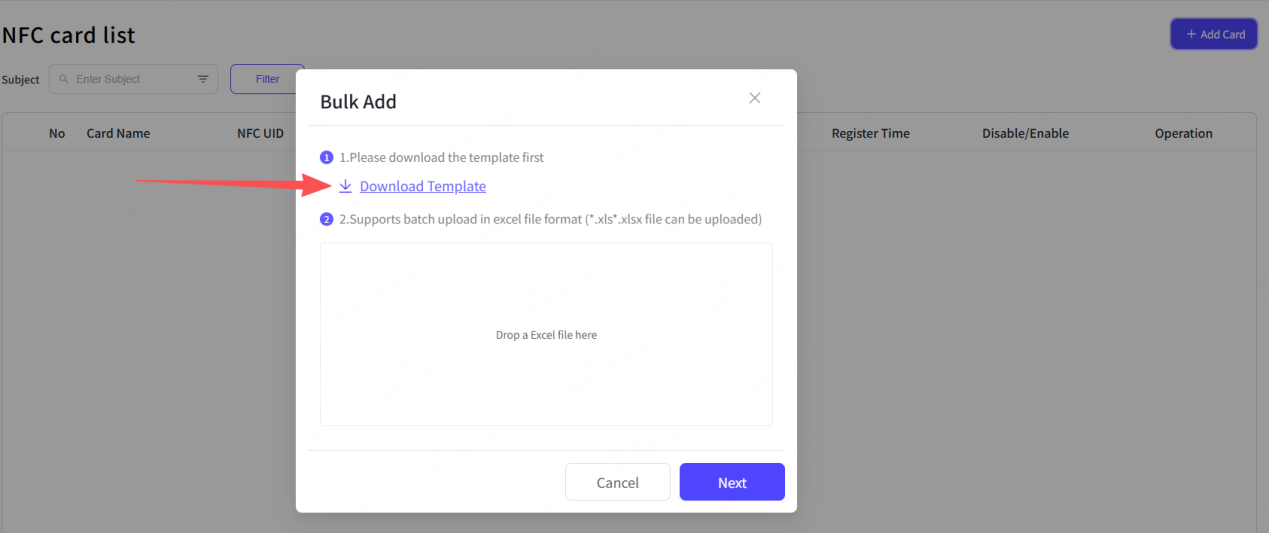
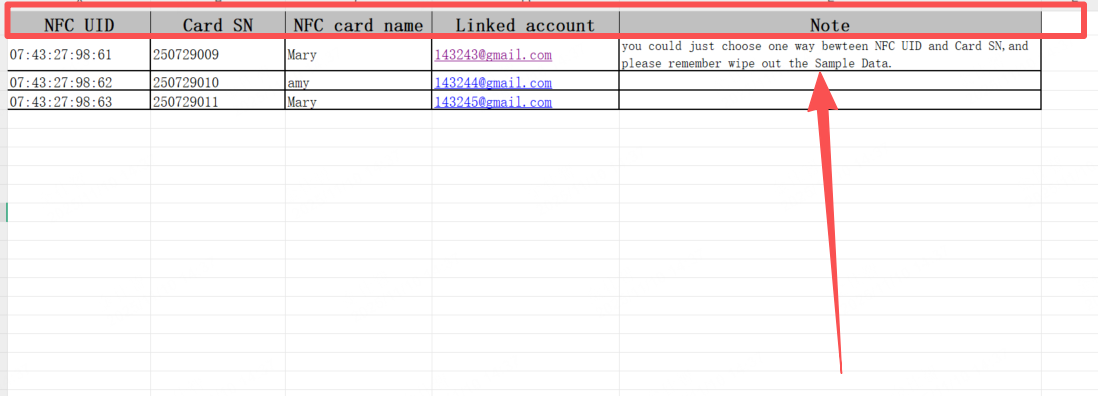
Step 3: Open the template and choose the add methods between “Card SN” and “NFC UID” as you prefer, and then filling these right numbers with your cards, alongside with the “NFC card name” and “Linked account”.
Step 4: Check for the data and save it.
Step 5: Click the upload aera to choose the right file to upload.
Step 6: Click “Next” button.
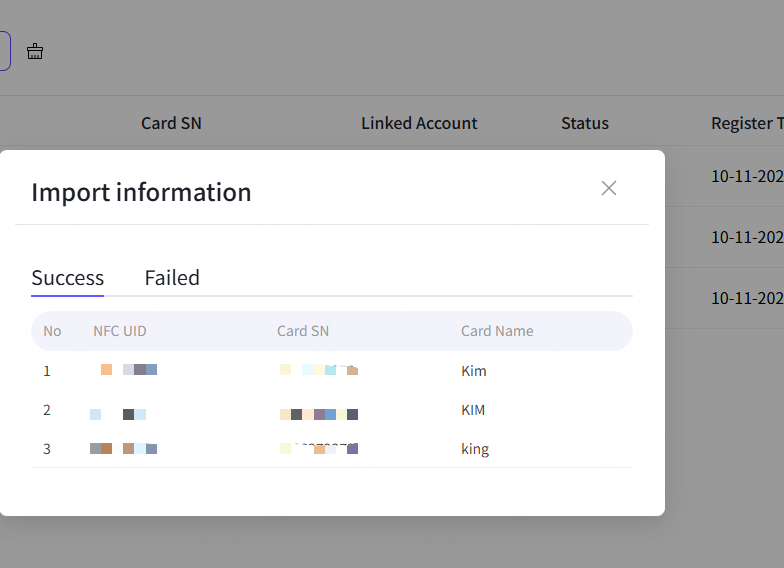
Step 7: The hint shows up, and it will show how many cards were successfully binding when others were not.
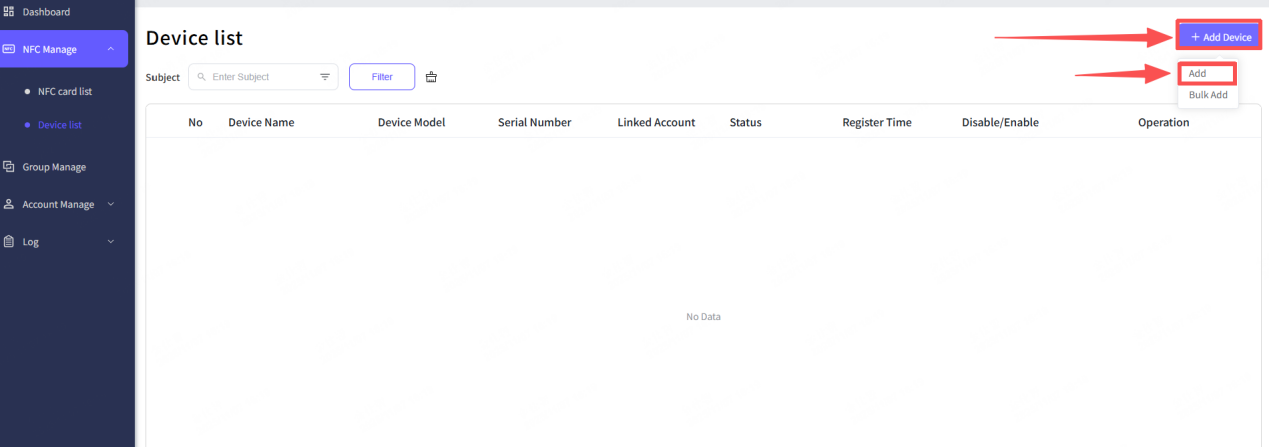
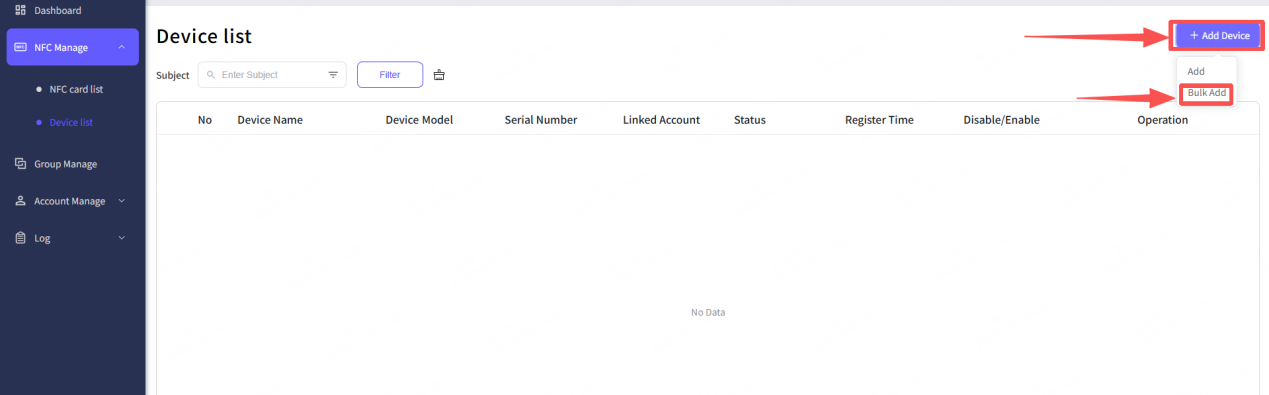
3.2 Device binding
For the connection, you are also need to binding your Newline panel device or IFPD to the portal.
“Add” mode, binding one device at a time
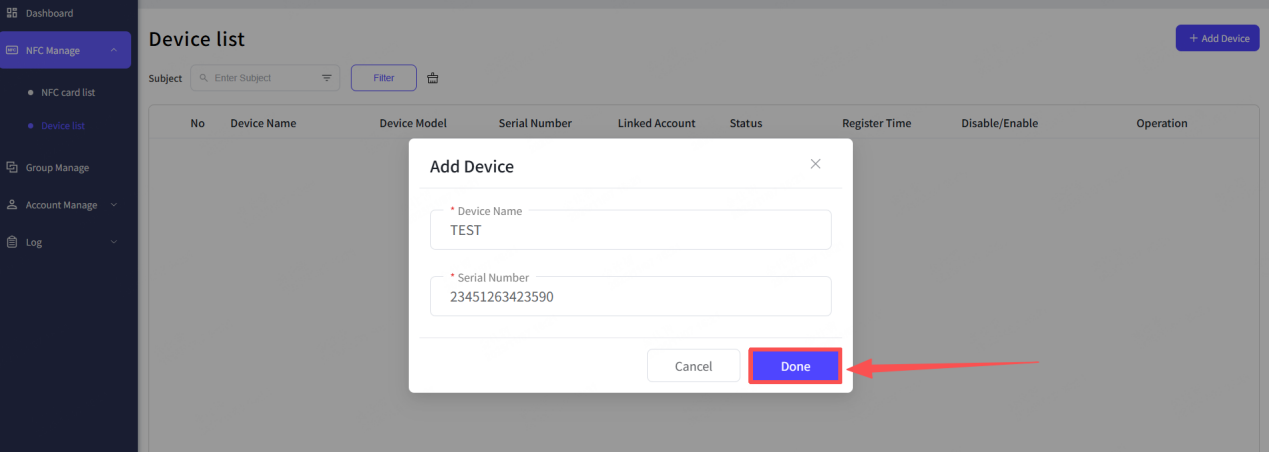
Step 1: Click “Add Device” button, choose “Add” option.
Step 2: Type in the name for your device.
Step 3: Type in the right serial number for your device.
Step 4: Click “Done” button.
Step 5: The hint shows up, it means you had successfully added your device. And you will see your device in the device list.
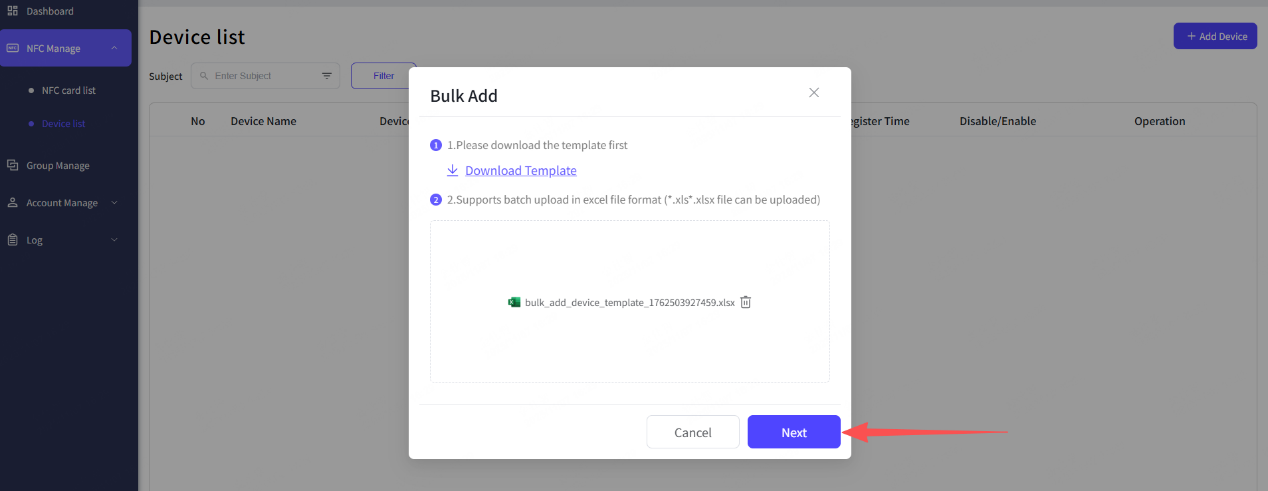
“Bulk Add” mode, binding multiple devices at a time.
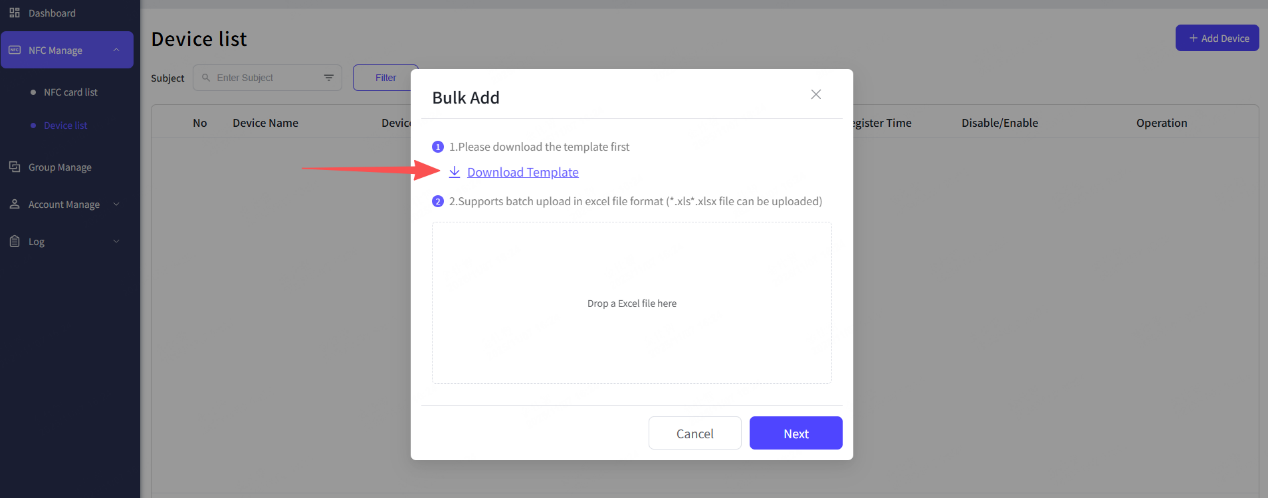
Step 1: Click “Add Device”, choose “Bulk Add” option.
Step 2: Download the template file.
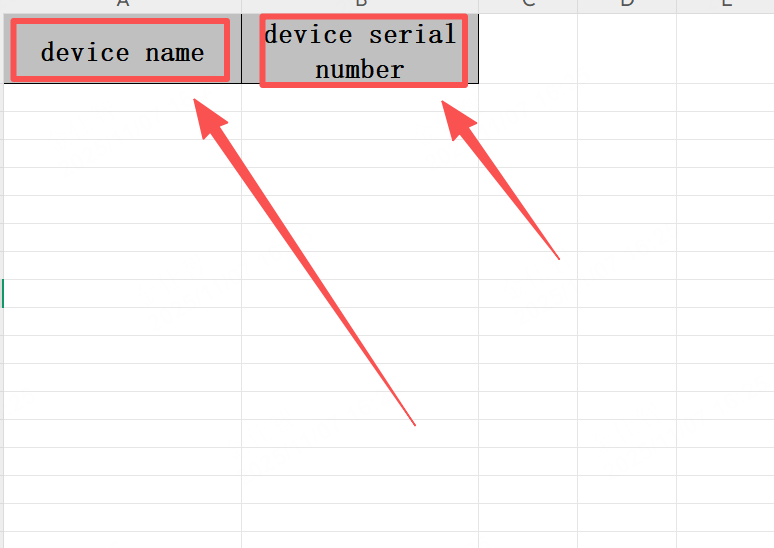
Step 3: Fill in these right serial numbers with your devices line by line, alongside with the device name.
Step 4: Check for the data and save it.
Step 5: Click the upload aera to choose the right file to upload.
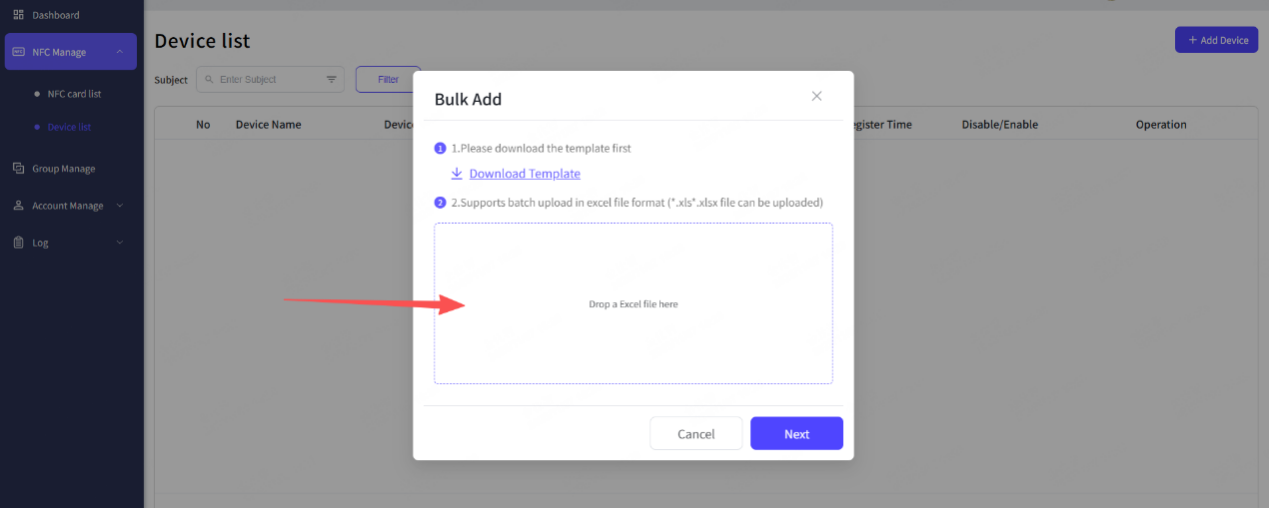
Step 6: Click “Next” button.
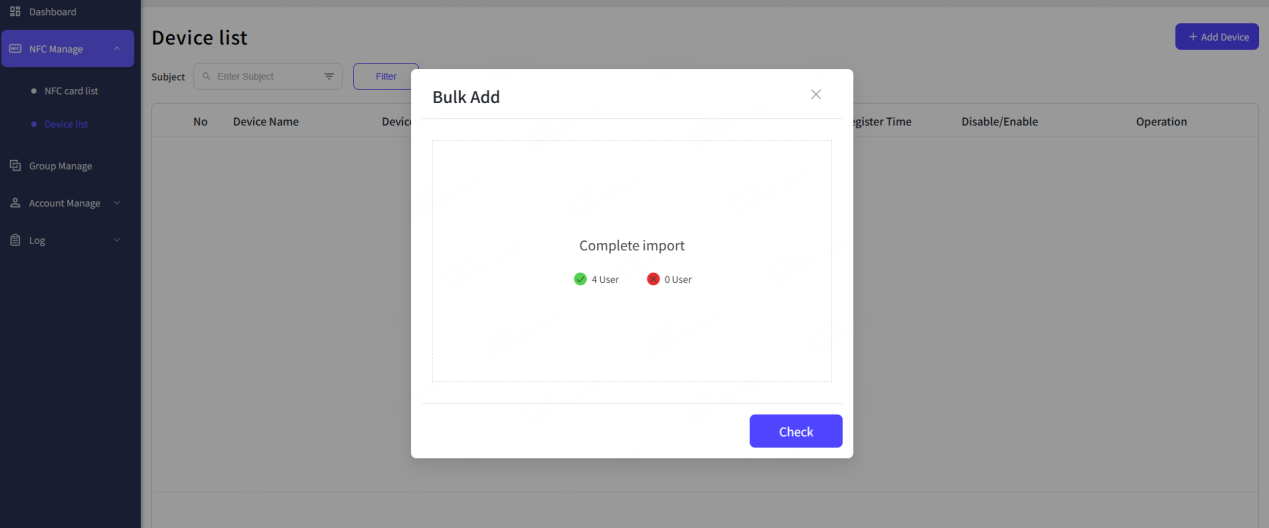
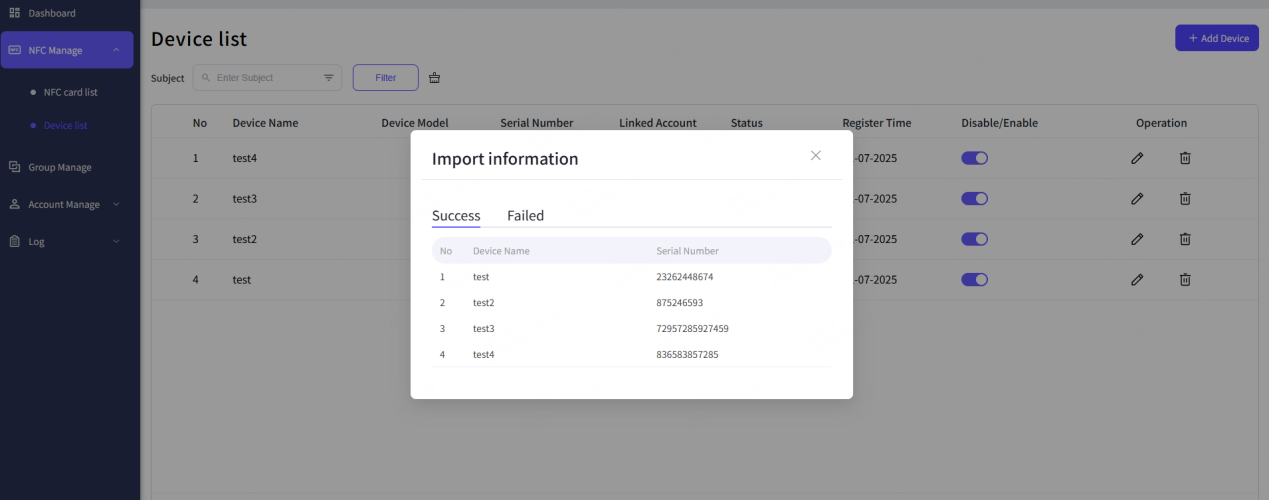
Step 7: The hint shows up, and it will show how many devices were successfully binding when others were not. You can click the check button to see the detail.
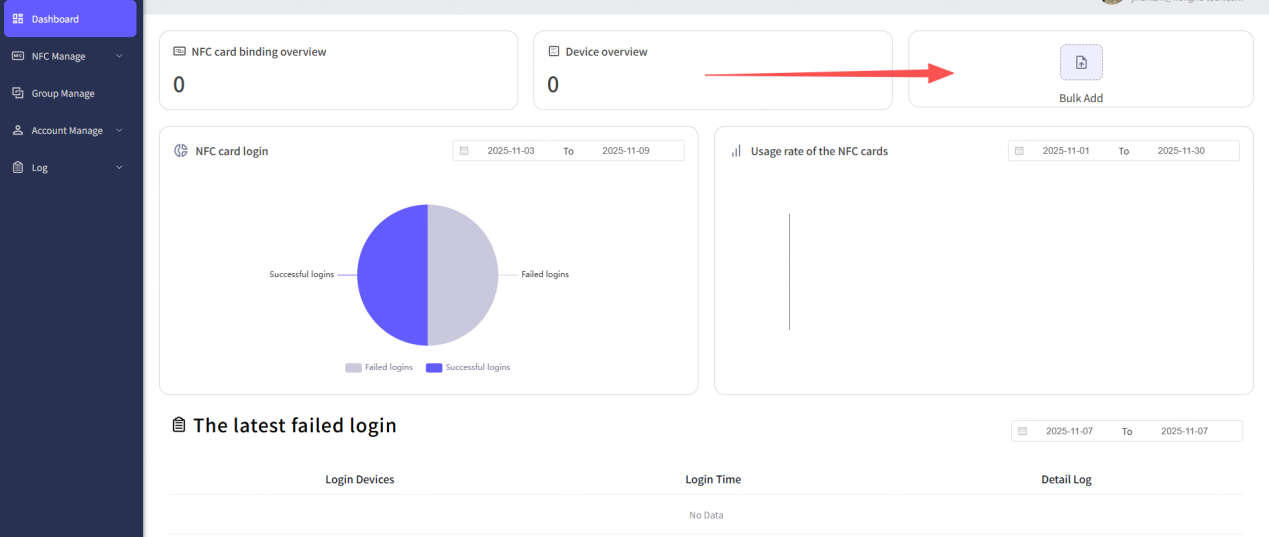
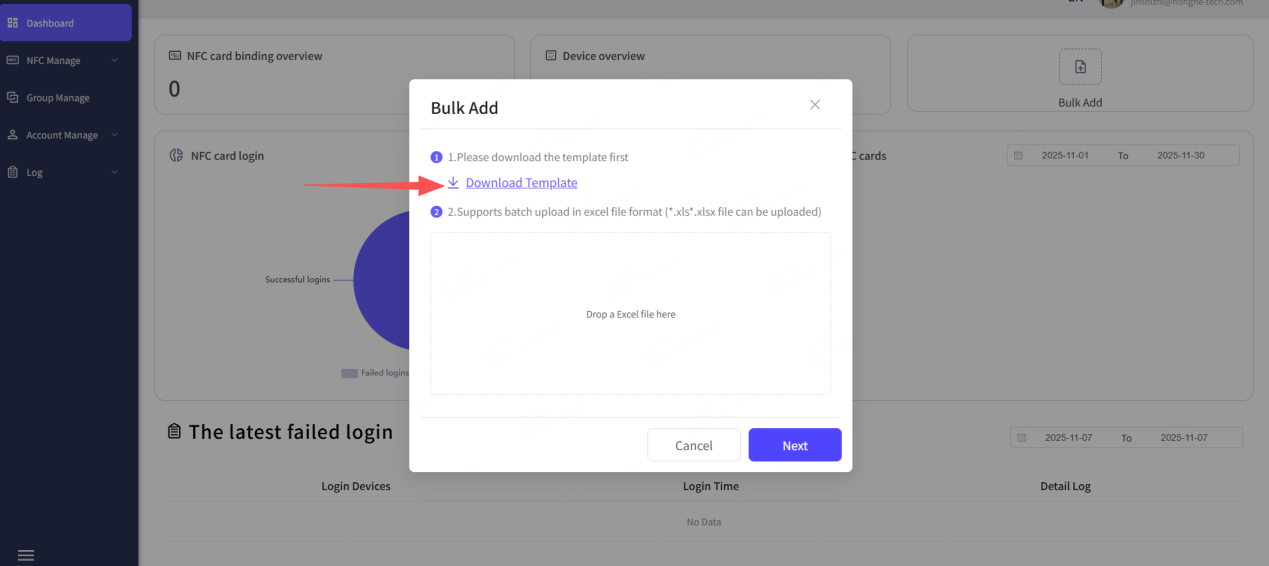
3.3 The whole link bulk
In order to improve the efficiency, you can use this “Bulk Add” on the dashboard to bulk the NFC cards, panel devices, accounts inviting, and then create the connection between accounts and users right away. Simply using one template file to bulk those data.
The entrance is on the Dashboard
Step 1: Click “Bulk Add” button.
Step 2: Download the template file.
Step 3: Fill in both the two sheets, within the link connection for Account & Card, link connection for Device & Account.
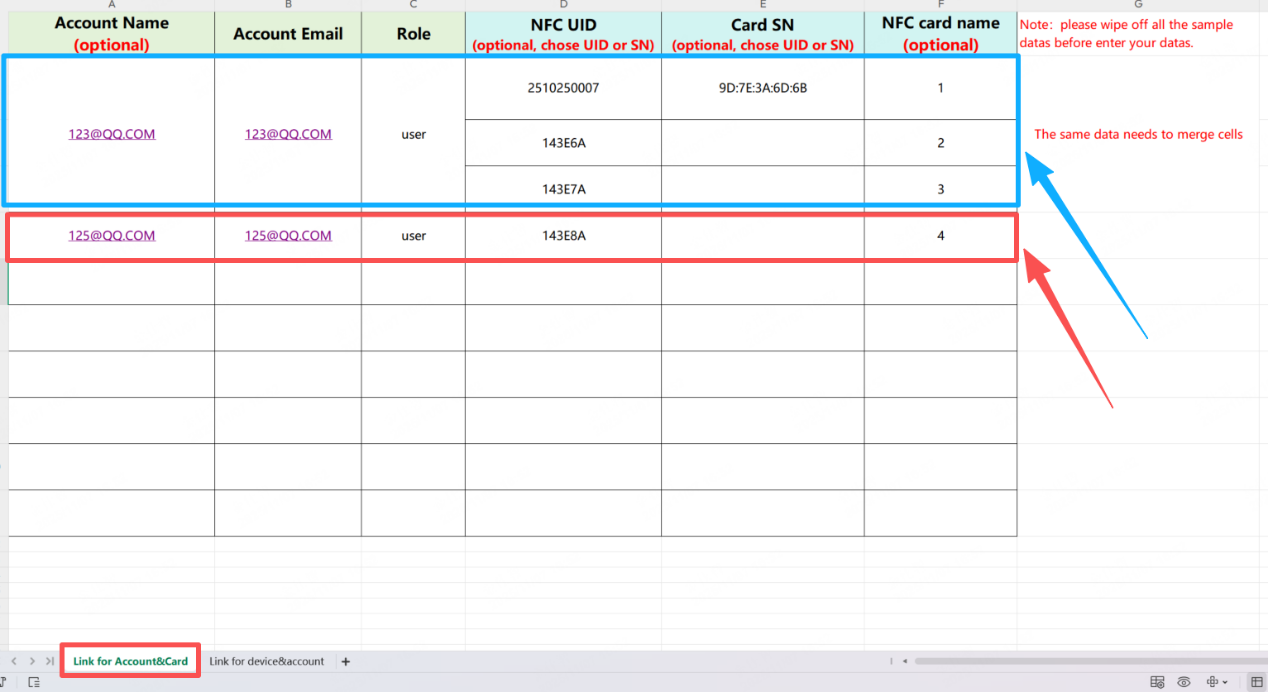

Step 4: Check for the data and save it.
Step 5: Click the upload aera to choose the right file to upload.
Step 6: Click “Next” button.
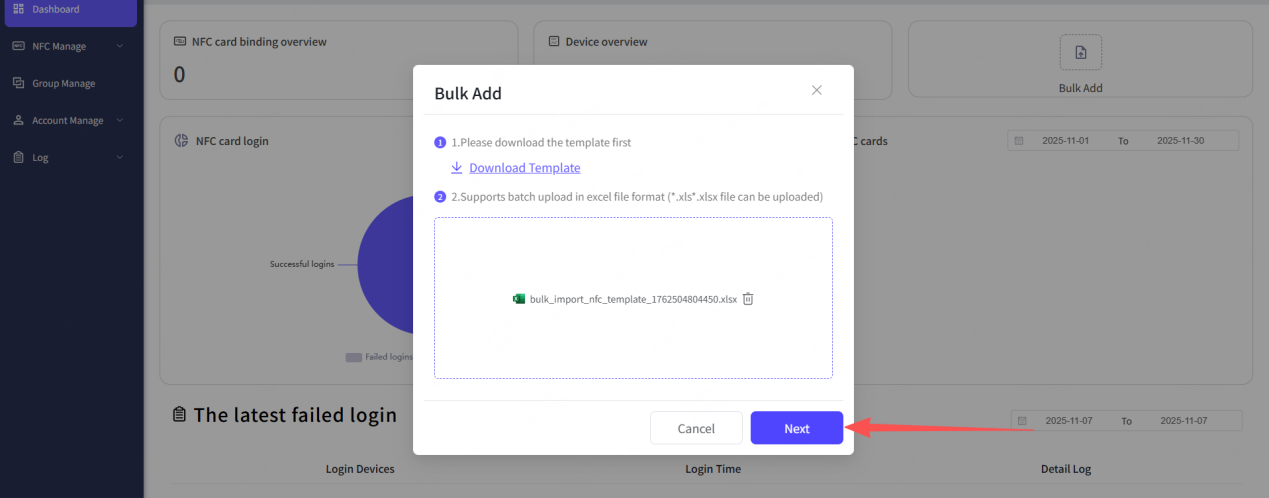
Step 7: The hint shows up, and it will show how many data were successfully bulk when others were not.
If your file had some errors, it will show you the reminder along with the error marked file for you to double check.

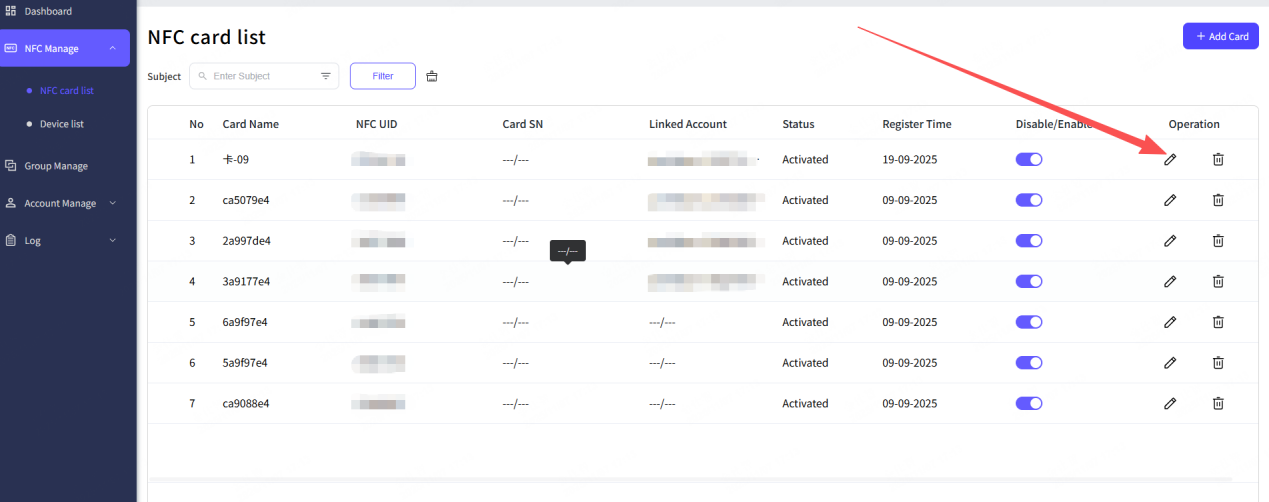
3.4 The NFC card list
From this list, you (as the organization admin role) can check out all the NFC cards were bind to the portal.
For each NFC card, you (as the organization admin role) can operate actions such as edit and delete.
In the Edit Card pop-up, you can change the card’s name, or change the linked account by select other ones.
Step 1: Click the edit button of the card from the card list.
Step 2: Type in the new name on the “Card Name”.
Step 3: Click the linked account, and select a new one from the drop-down list.
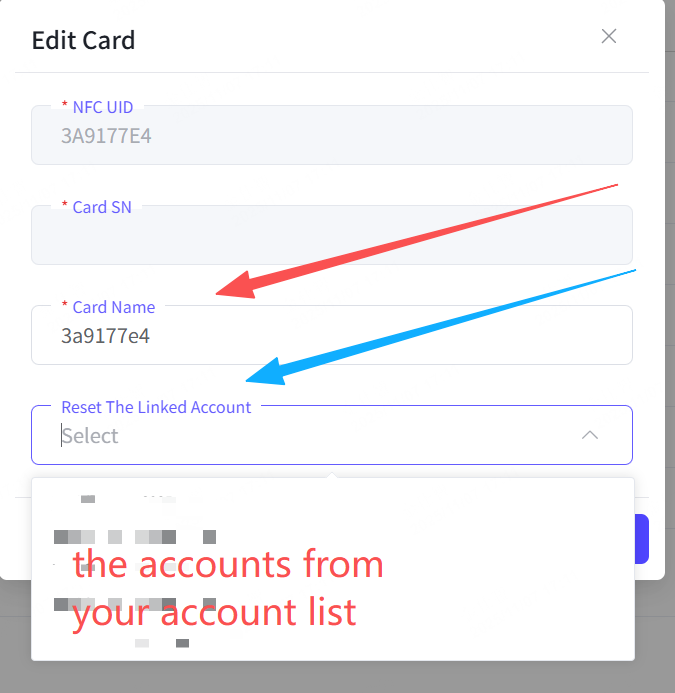
Step 4: Click “Done” button.
Step 5: The new change has done.
As for the 'Disable/Enable' option, switching the card to 'Disable' mode means that it can no longer function properly.

And the “Delete” option, once you decided to delete a card from the card list, it will completely remove the card and all the related data from the NFC management platform.
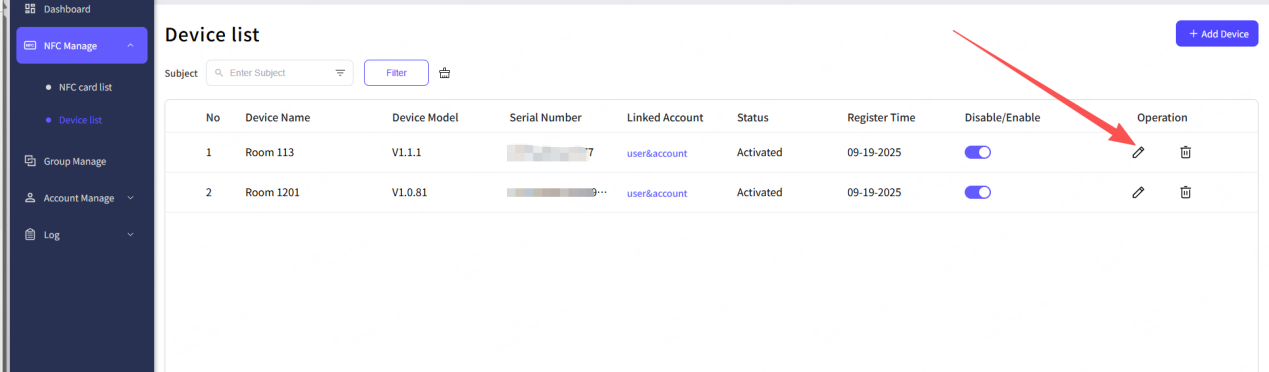
3.5 The Device list
From this list, you (as the organization admin role) can check out all the panel devices were bind to the portal.
For each device, you (as the organization admin role) can operate actions such as edit and delete.
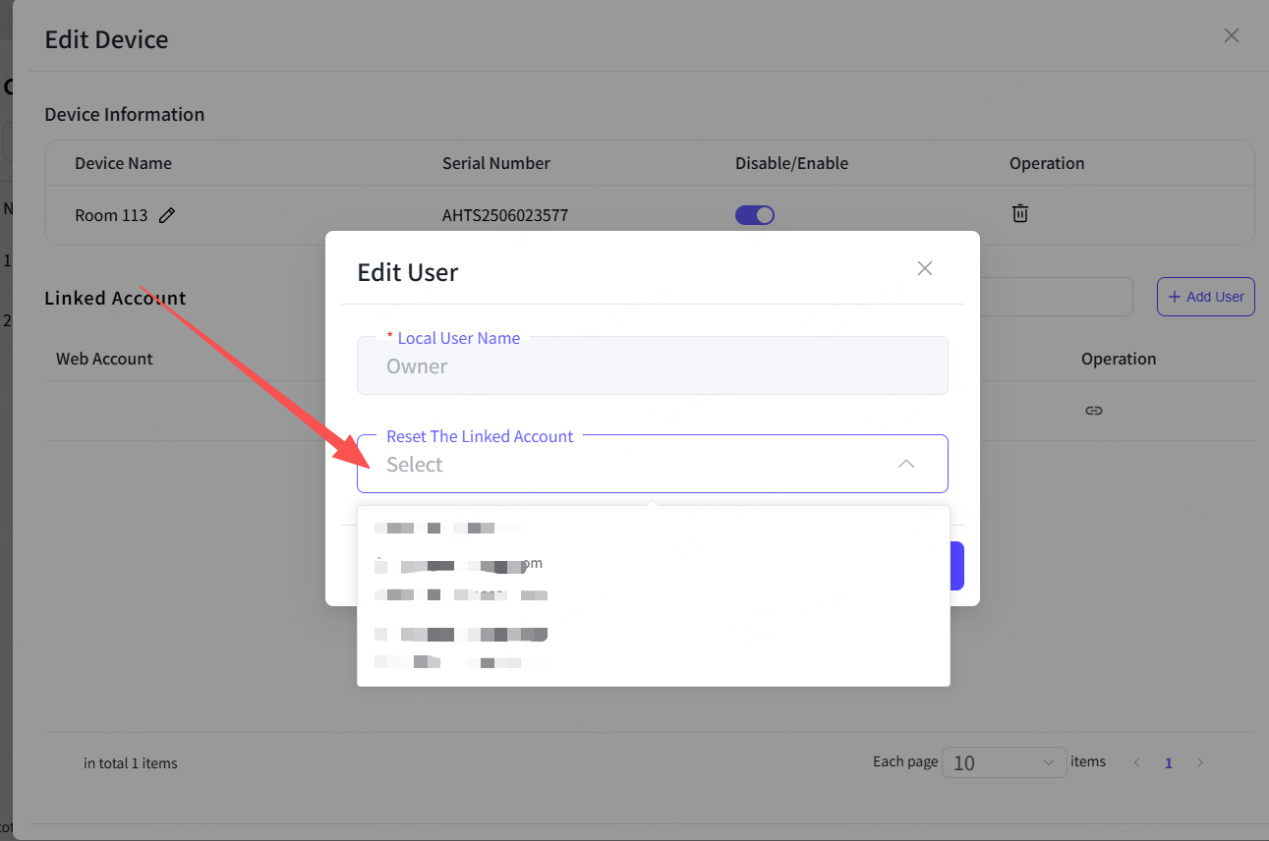
In the edit device pop-up, you can select or adjust the link between a local user and a web account. So that the NFC cards which is linked to this web account can be create a connection to the local user on this device.
Scenario 1: Create a link for the user that was already exist on the device.
Step 1: Click the edit button of the device from the device list.
Step 2: Check out the Edit Device pop-up to see the details for the local users.
Step 3: Select the exist user and then click the “Operation” button.

Step 4: In the Edit User pop-up, click the “Reset The Linked Account” to choose an account that you would like to match with the local user. And you can always change the linked account as you prefer.
Scenario 2: Create a brand-new local user and then linking to an account.
Step 1: Click the edit button of the device from the device list.
Step 2: Click the “Add User” button from the Edit Device pop-up.
Step 3: In the “Add User” pop-up to type in the new local user’s name.
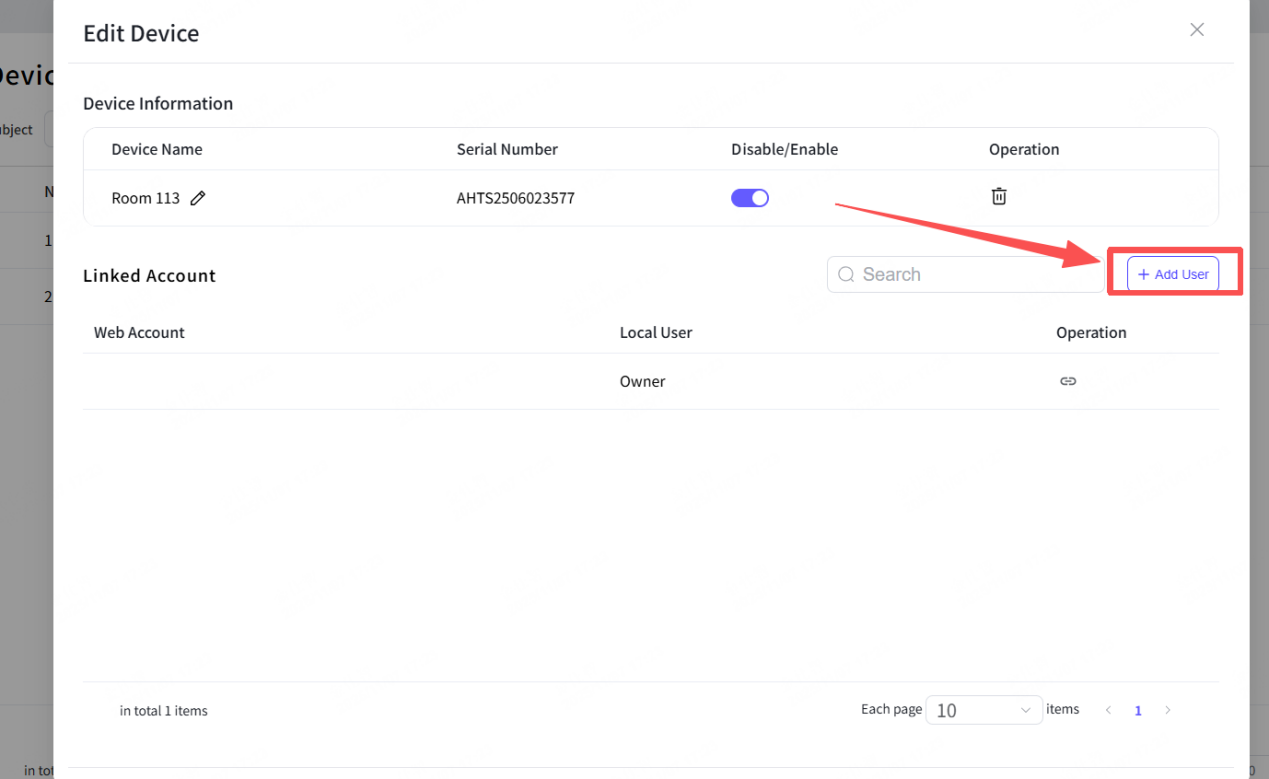
Step 4: choose a web account to match this new local user or not.
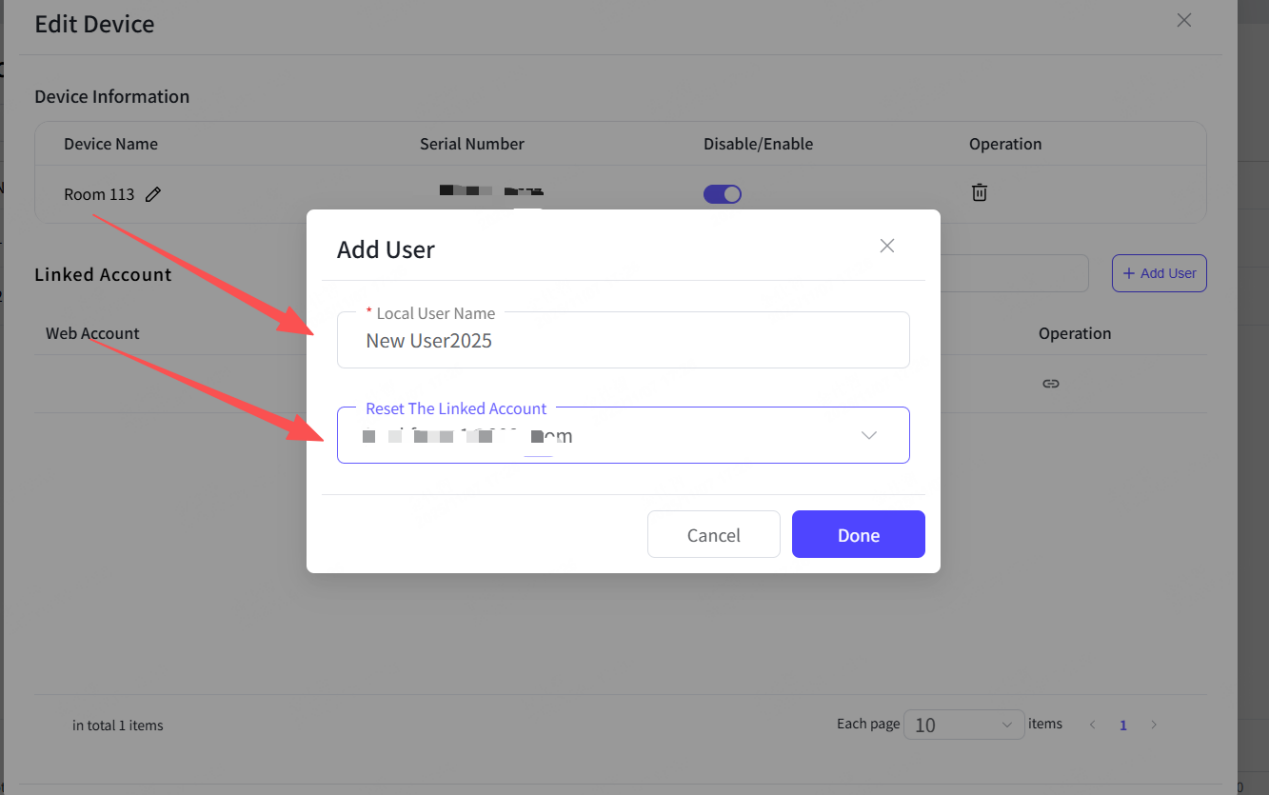
Step 5: Click the “Done” button.
Step 6: The hint shows up, which means you had created a new local user.
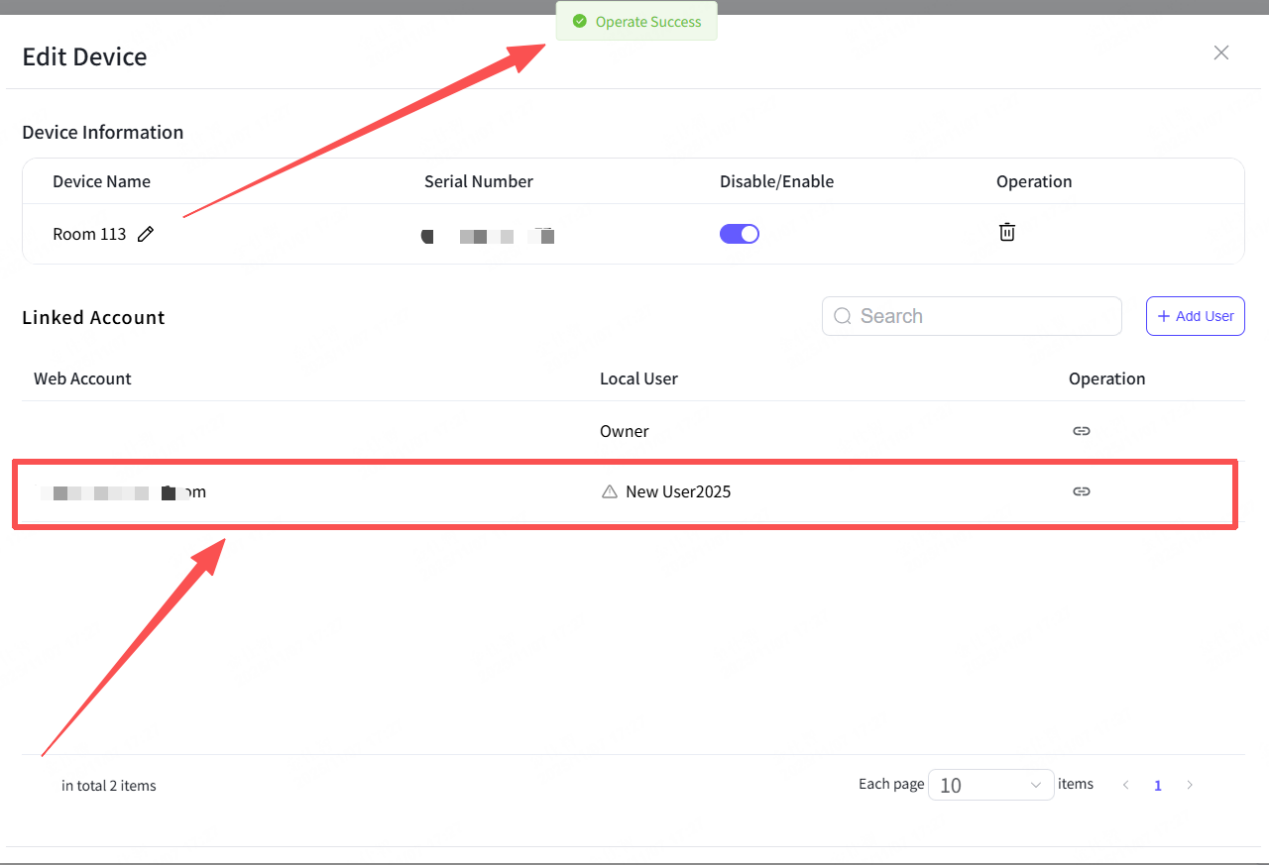
You can always adjust the link of user & account in every device, simply go to the edit device option.
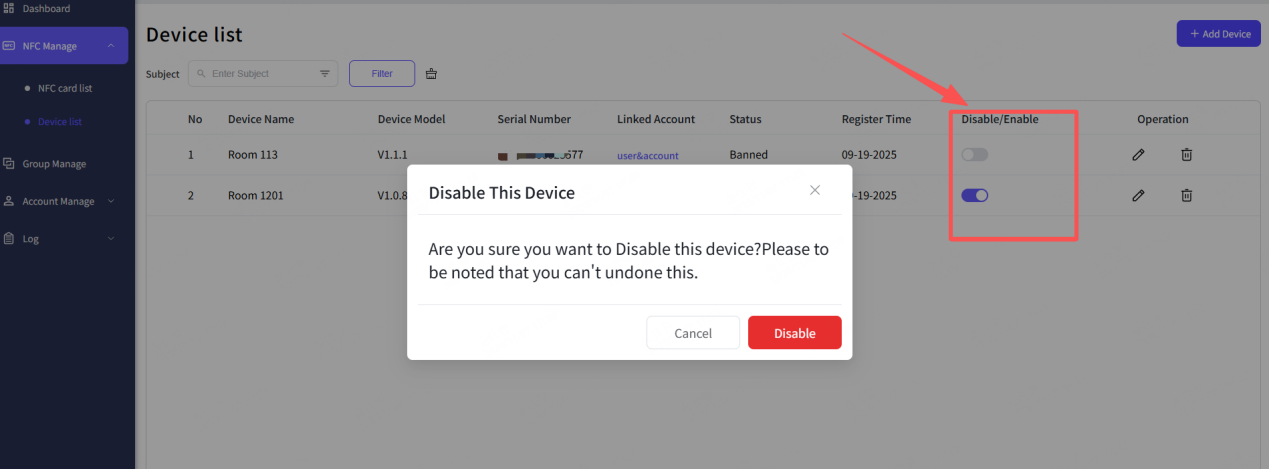
As for the “Disable/Enable” option, switching the device to 'Disable' mode means that it can no longer function properly on the NFC relevant features. You can also switch to ‘Enable’ in the panel device OS setting.
And the “Delete” option, once you decided to delete a device from the device list, it will completely remove the device and all the related data from the NFC management platform.
4. Account Manage
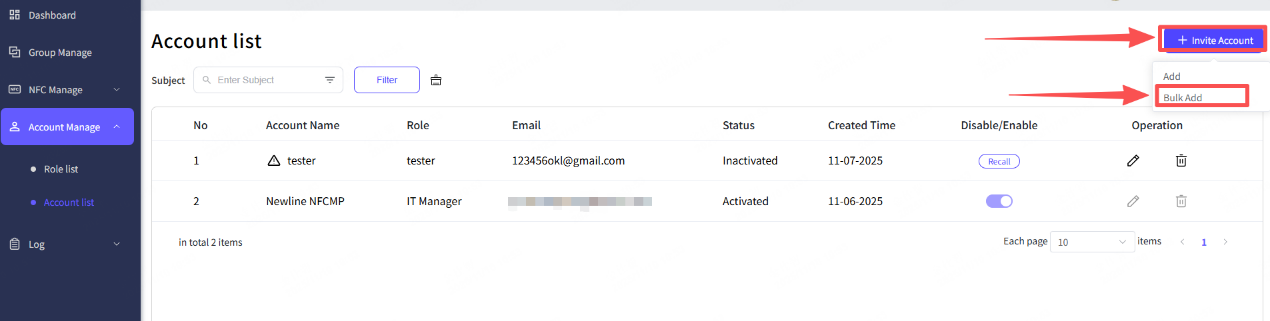
4.1 Invite Accounts
Invite account by the following steps.
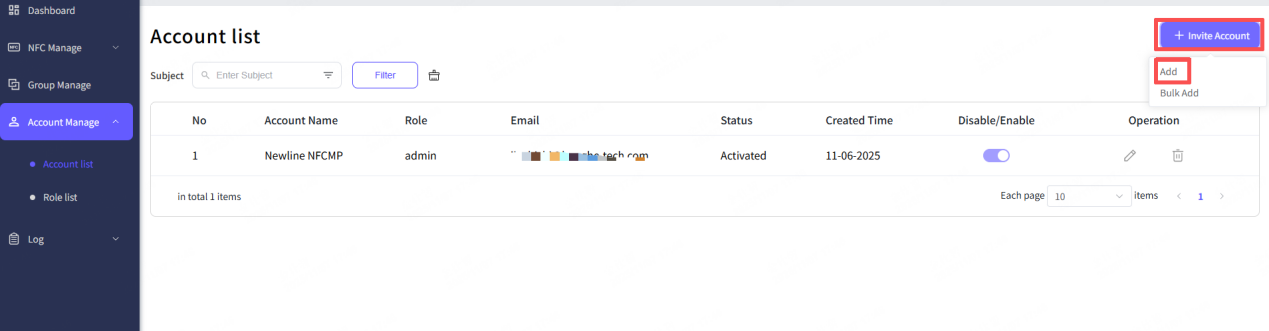
“Add” mode, you can invite one account at a time.
Step 1: Click the “Invite Account” button.
Step 2: Choose the “Add” option.
Step 3: Fill up the Email and the account name in the pop-up, then select a role for this new account.
Step 4: Click the “Done” button.

Step 5: The hint shows up, as the invite link had sent by the Email.

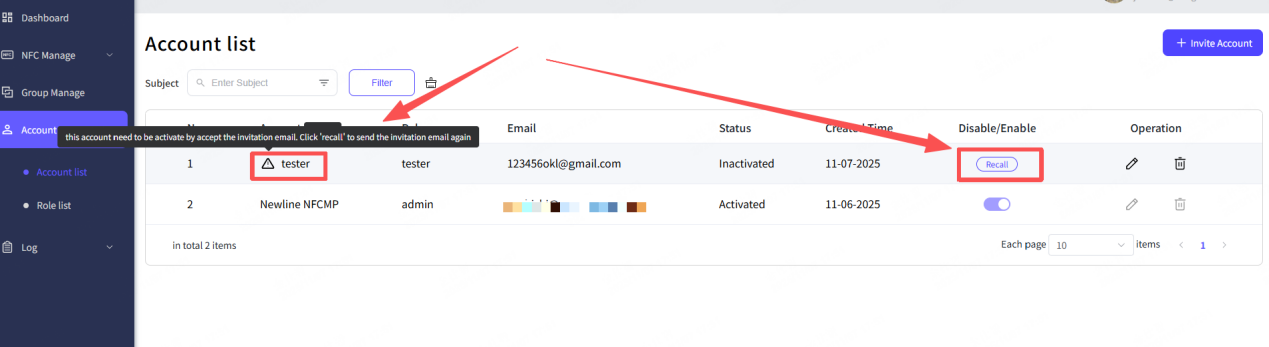
Step 6: The new account will show up at the Account list, and if the account owner didn’t activate the account, it will have the reminder ICON to clarify its current status. And you can send the invite link again by click the “Recall” button.
“Bulk Add” mode, you can invite multiple accounts at a time.
Step 1: Click the “invite Account” button.
Step 2: Choose the “bulk Add” option.
Step 3: Download the template file.
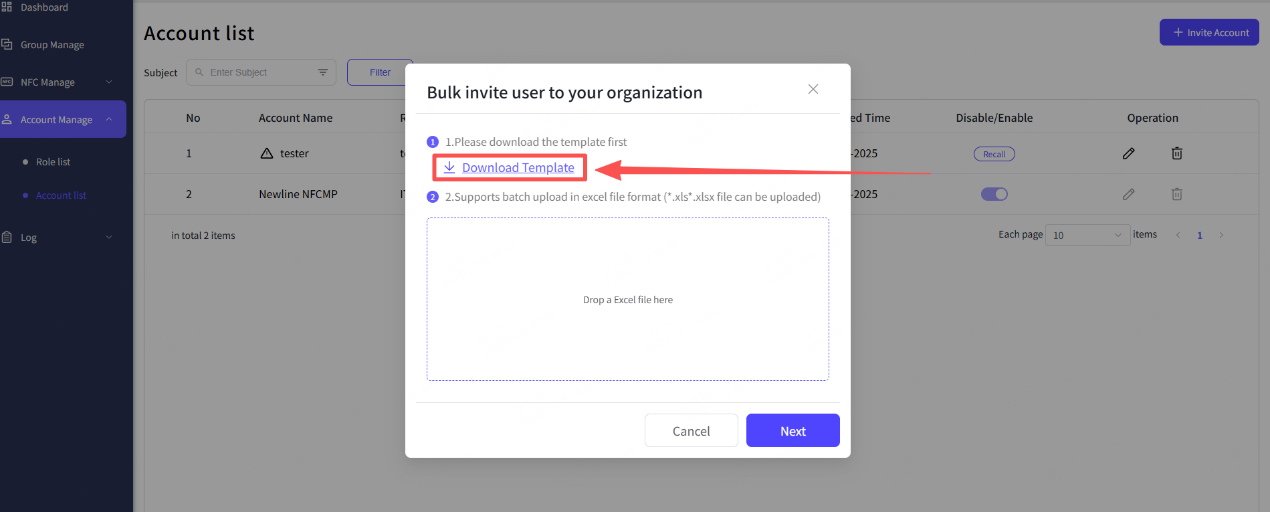
Step 4: Fill out the file with the “Account Name” 、 “Account Email”, “Role” line by line.

Step 5: Check for the data and save it.
Step 6: Click the upload aera to choose the right file to upload.
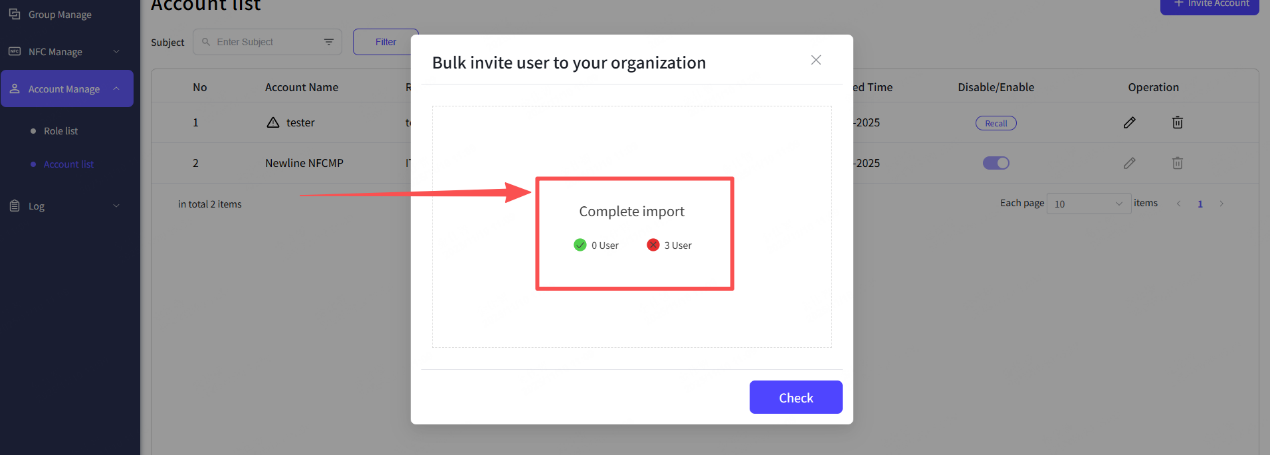
Step 7: Click “Next” button.

Step 8: The hint shows up.
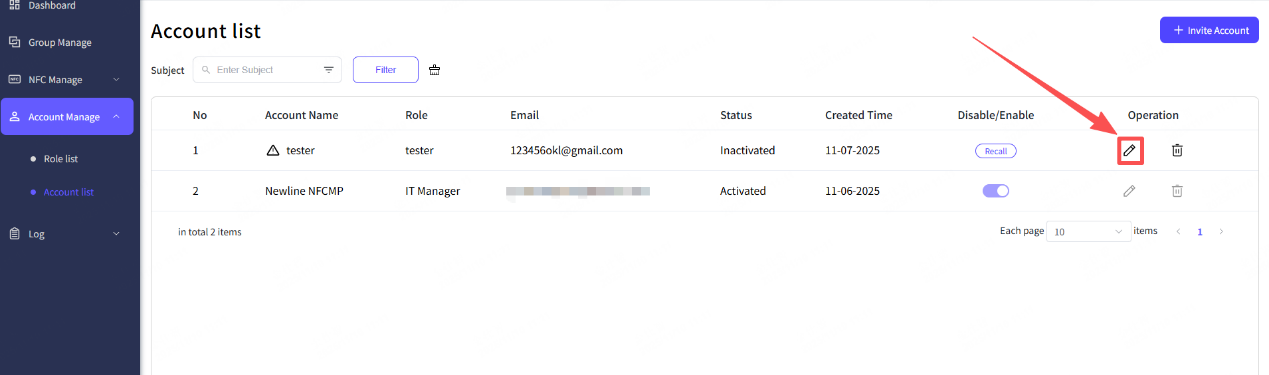
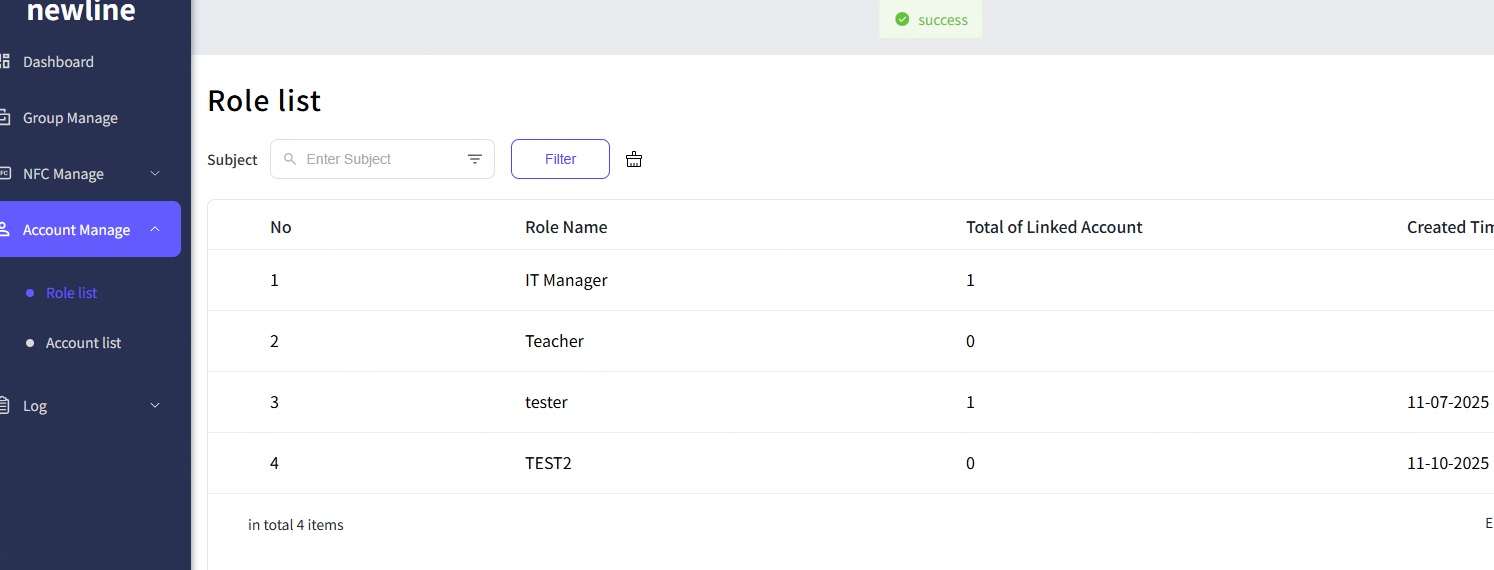
4.2 The Account list
In this list, you (as the organization admin role) can check all the account that were invited to your organization. You can browse the details or simply edit and delete specific account.
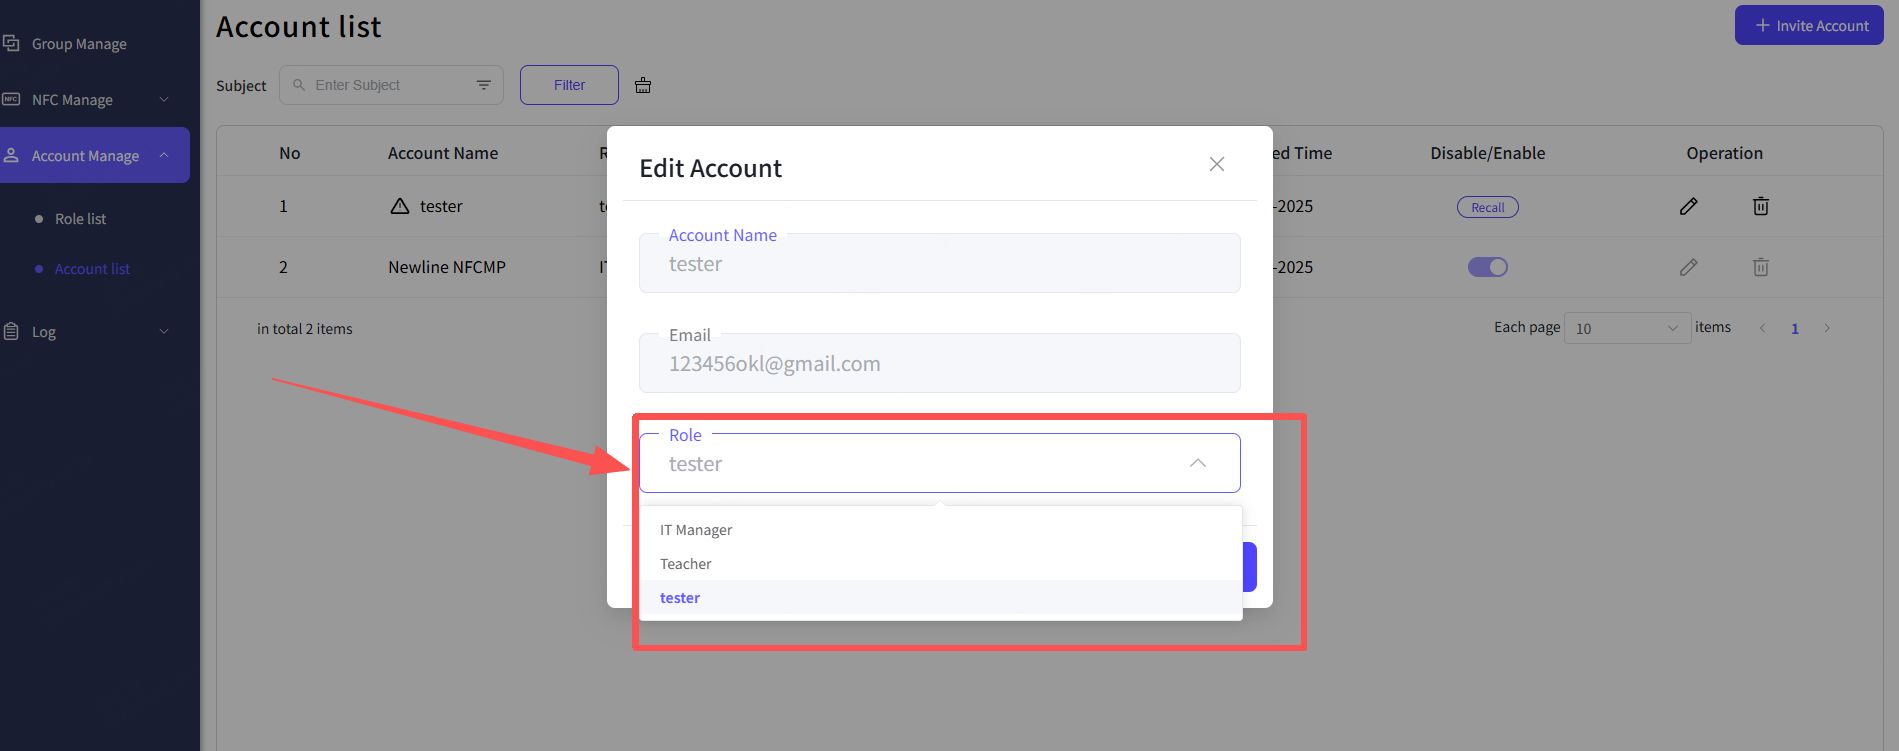
You can switch the account’s role in the Edit Account pop-up.
Step 1: Click the edit button from the “Operation”
Step 2: Select the role from the Edit Account pop-up.
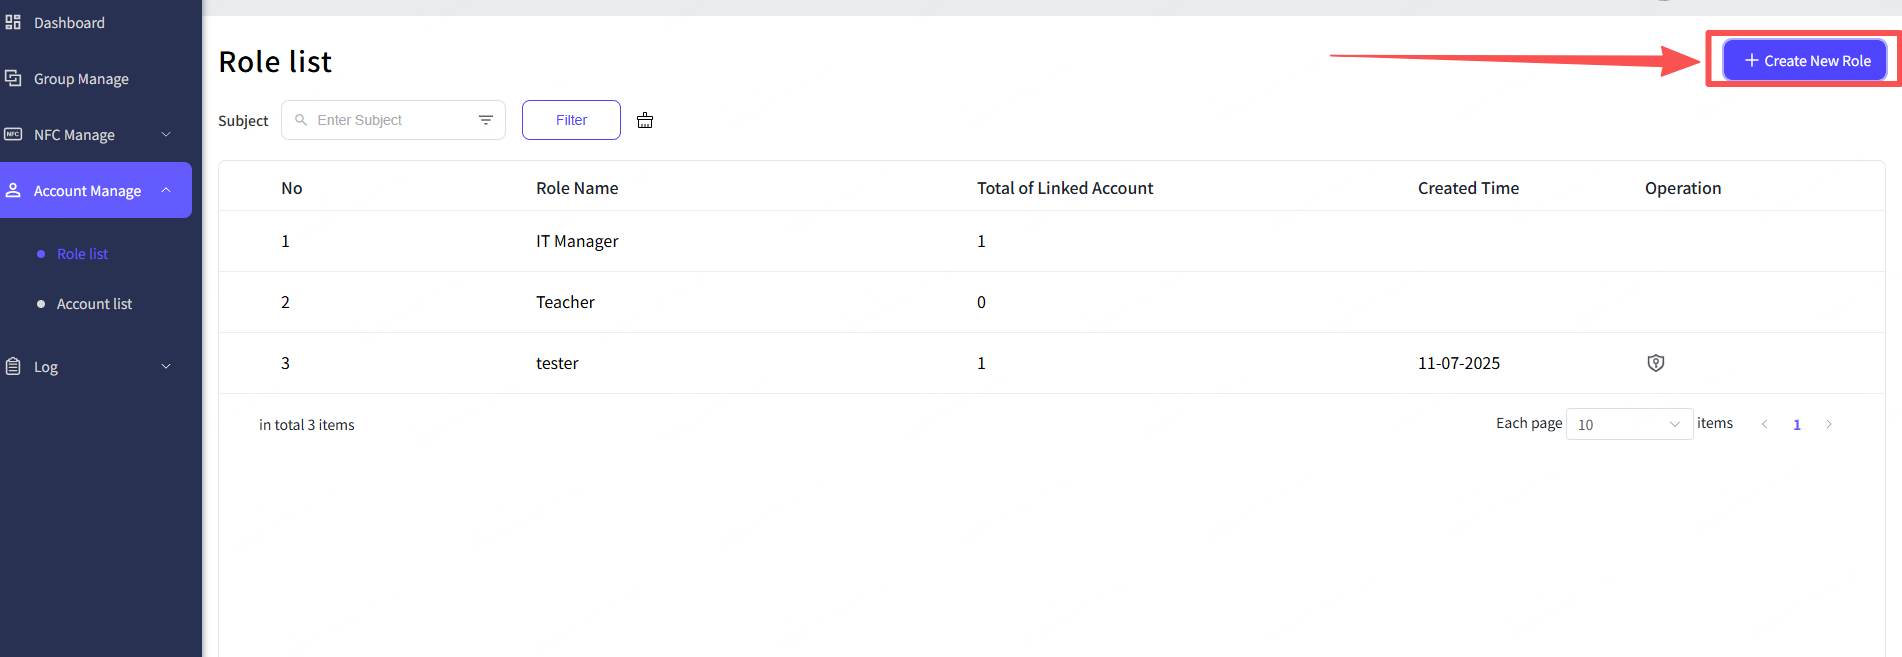
4.3 Role assign
You can simply create a new role, or change the permission range of the role. Here is the guideline.
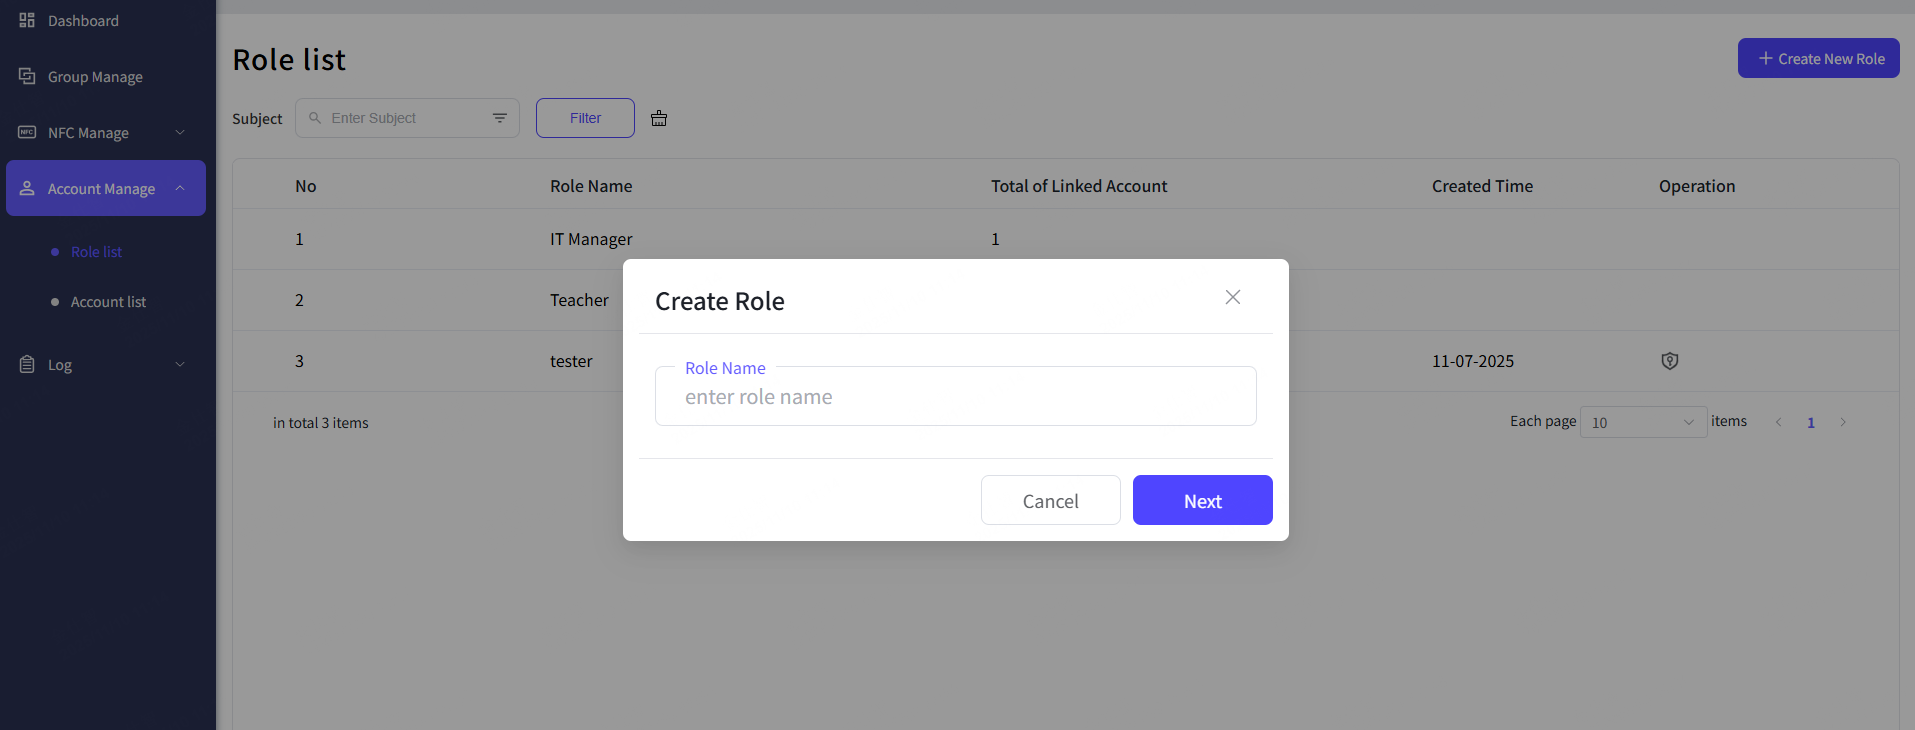
Create a new role
Step 1: Click “Create New Role” button.
Step 2: Type in the role name.
Step 3: Click “Next” button.
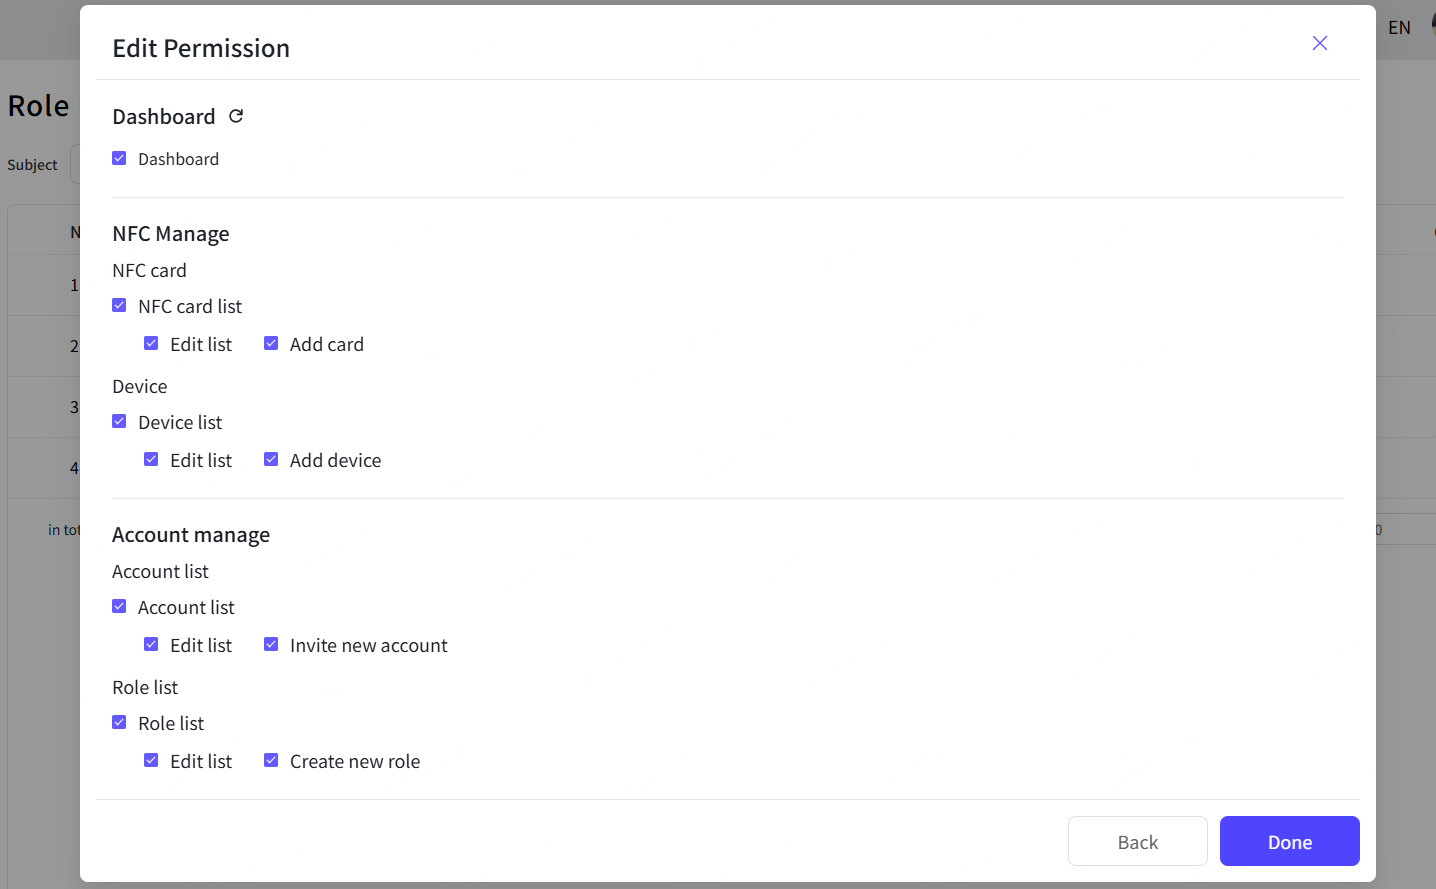
Step 4: Check the permission boxes for the role.
Step 5: Click “Done” button.

Step 6: The hint shows up, successfully done.
Change the permission range
Step 1: Click the edit button form the “Operation”
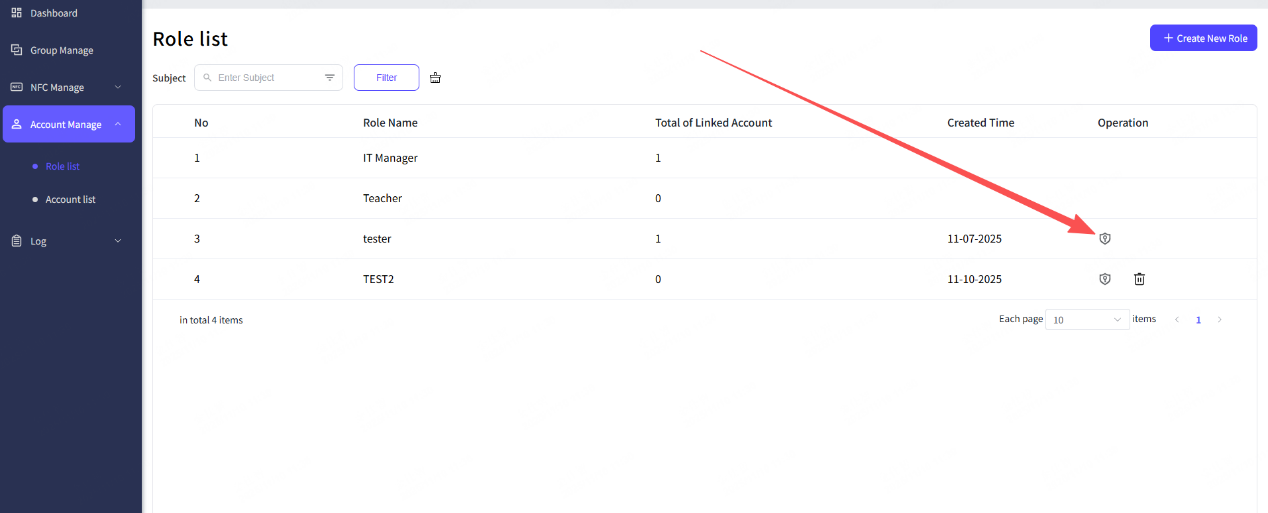
Step 2: Make the adjustment for permission boxes checking.
Step 3: Click the “Done” button.
Step 4: The hint shows up, successfully done.
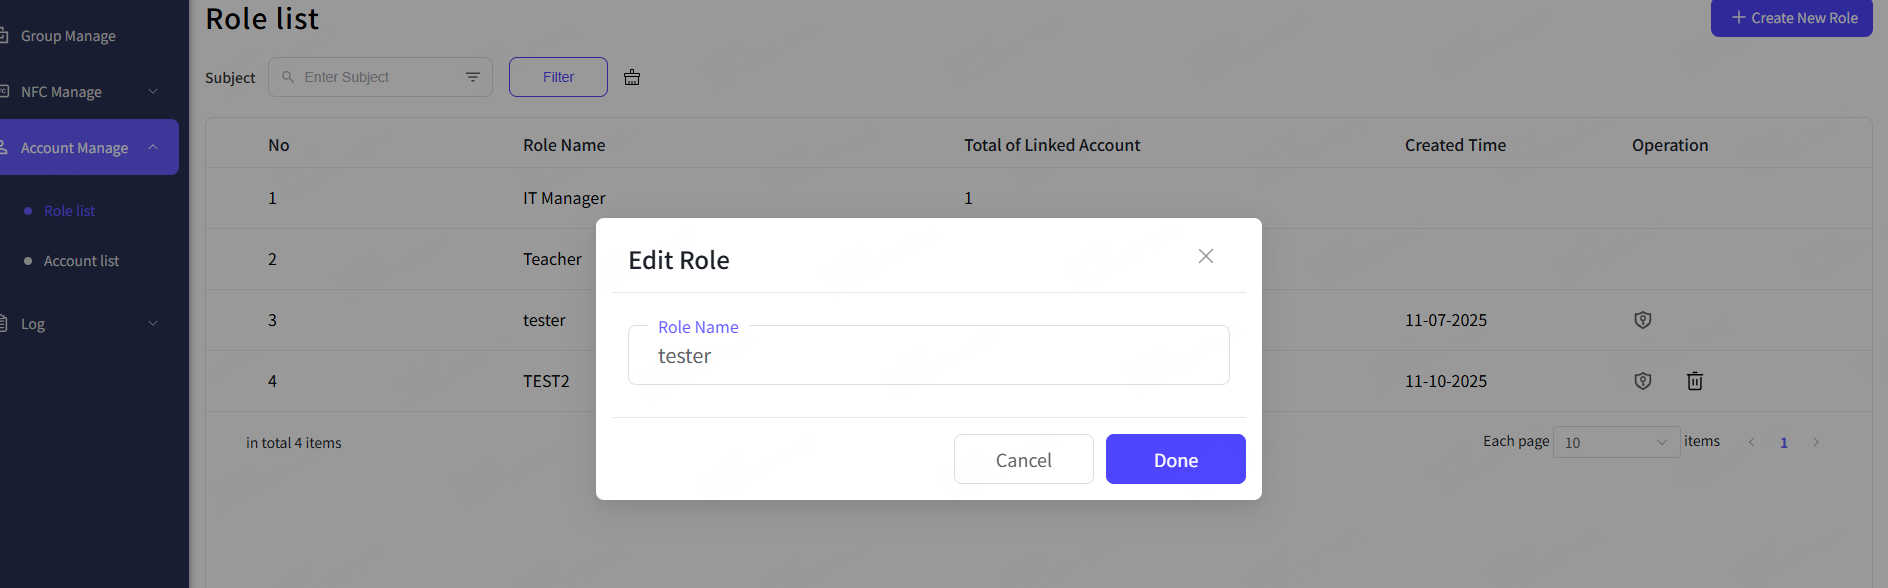
Change the role’s name
Step 1: Click the edit button near the role name.

Step 2: Type in the new name in the Edit Role pop-up.
Step 3: Click the “Done” button.
Step 4: The hint shows up, successfully done.
Delete the roles
If you want to delete the roles, click the delete button from the Operation and then confirm to delete. But the role can’t be deleted if it was linked to accounts, you have to remove all the related accounts from this role.
As for the two default roles “IT Manager” \ Teacher”, them are two standard roles, which cannot be remove or edit.

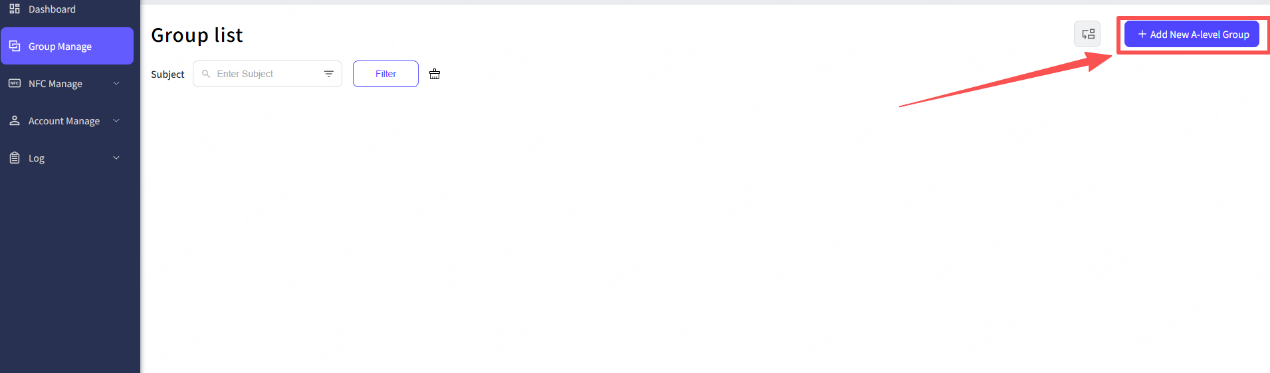
5. Group Manage
5.1 Create groups
Newline NFC Management platform can create the groups up to three layers, as the A- level\B-level\C-level. Here is how to start.
Step 1: Click the “Create New A-level Group” button.
Step 2: Fill in the A-level group name, and then you can choose to create B-level and C-level or not.
Step 3: Click the “Done” button.
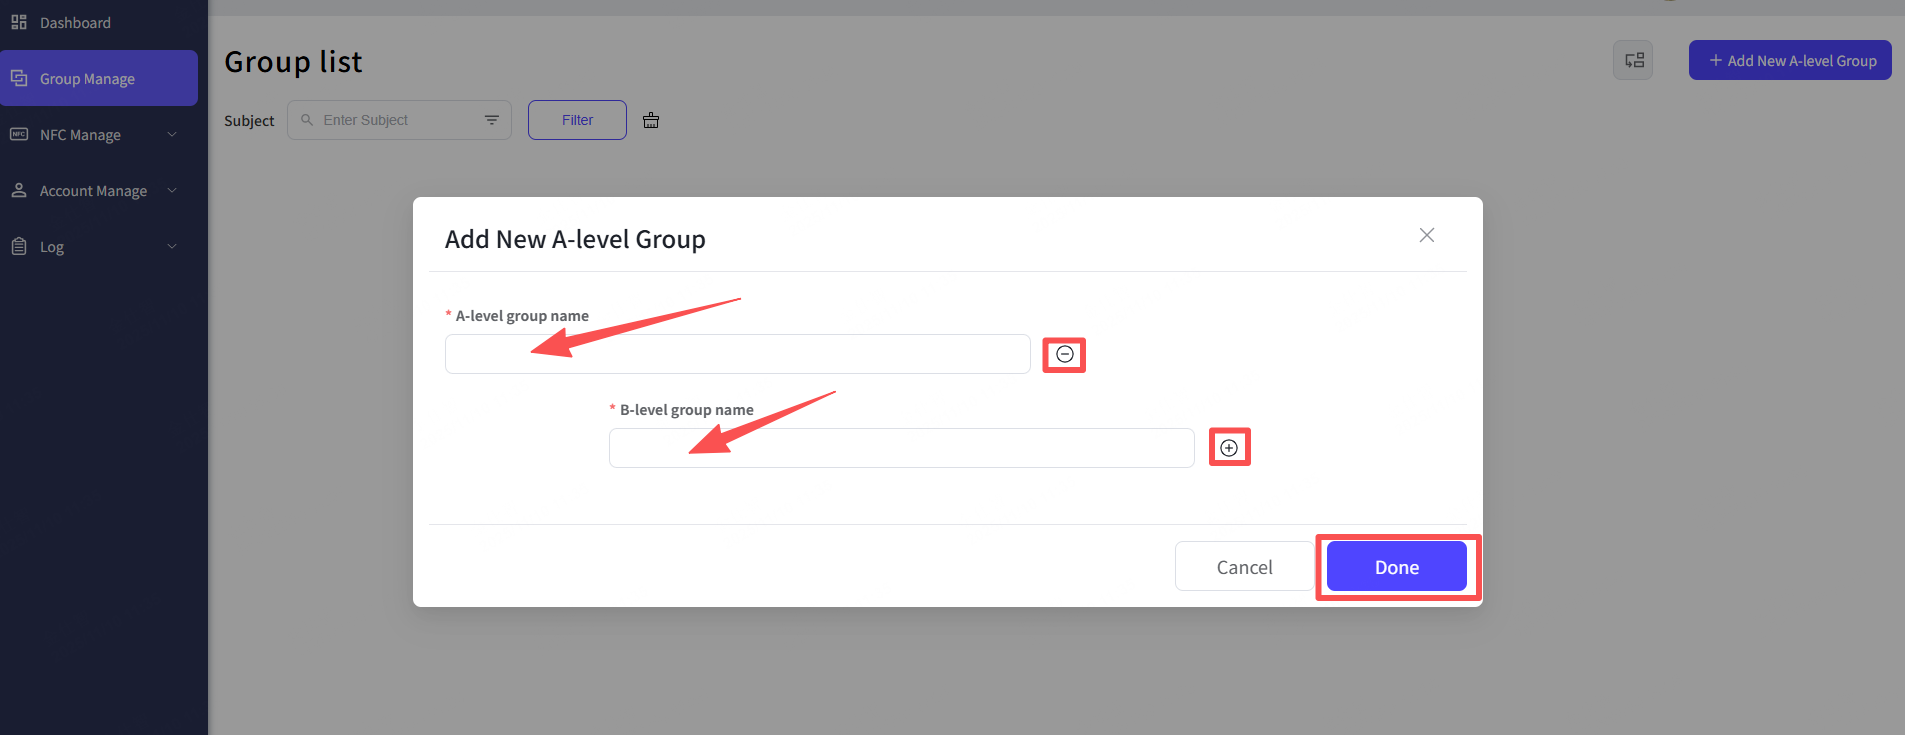
Step 4: The hint shows up, successfully done.
5.2 Adding the group members
The groups are to select and arrange a certain number of accounts, so that you can adding accounts as members to the groups. But please to be noticed that the members can be only added in the minimum level of the group.
Step 1: Select the minimum level of your group.
Step 2: Click the adding button on the level title.
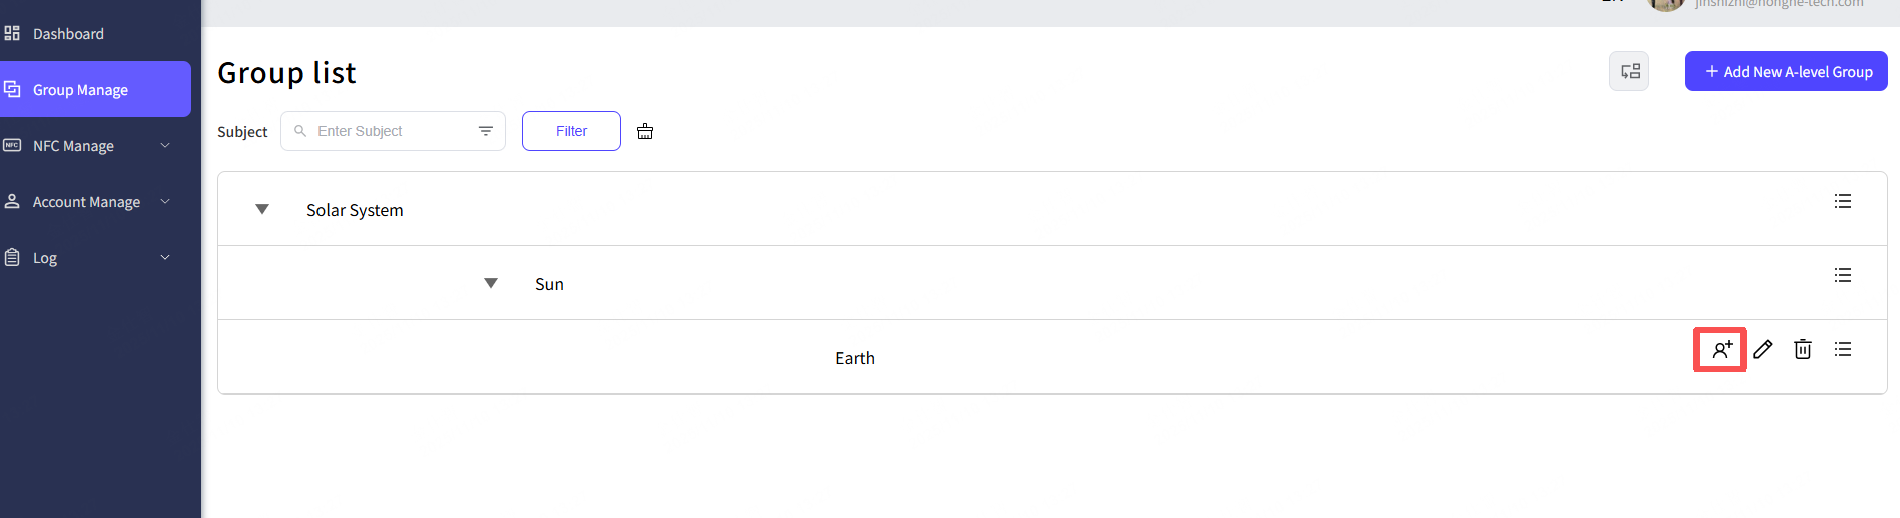
Step 3: Select the accounts you want to add to the group.
Step 4: Click the “Done” button.

Step 5: The hint shows up, adding successfully.
5.3 Switch the group members
You can switch the members from group to group.
Step 1: Select the member accounts from the group list.
Step 2: Click the switch button.
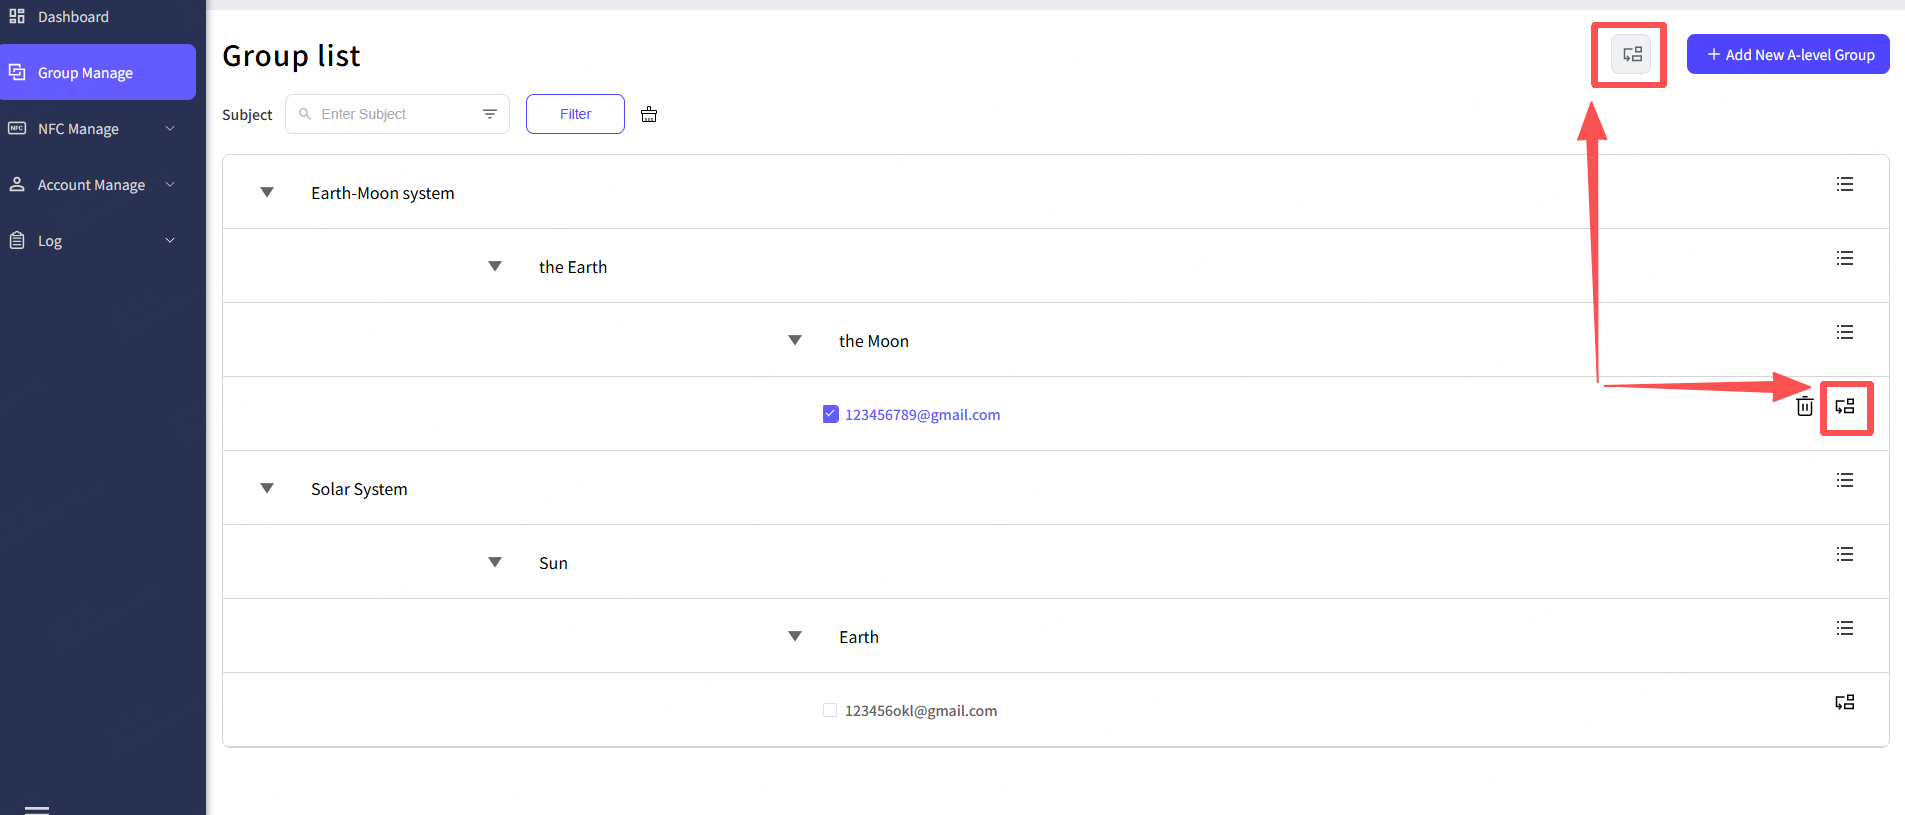
Step 3: Choose the switch path from the Select Group pop-up.
Step 4: Click “Done” button.
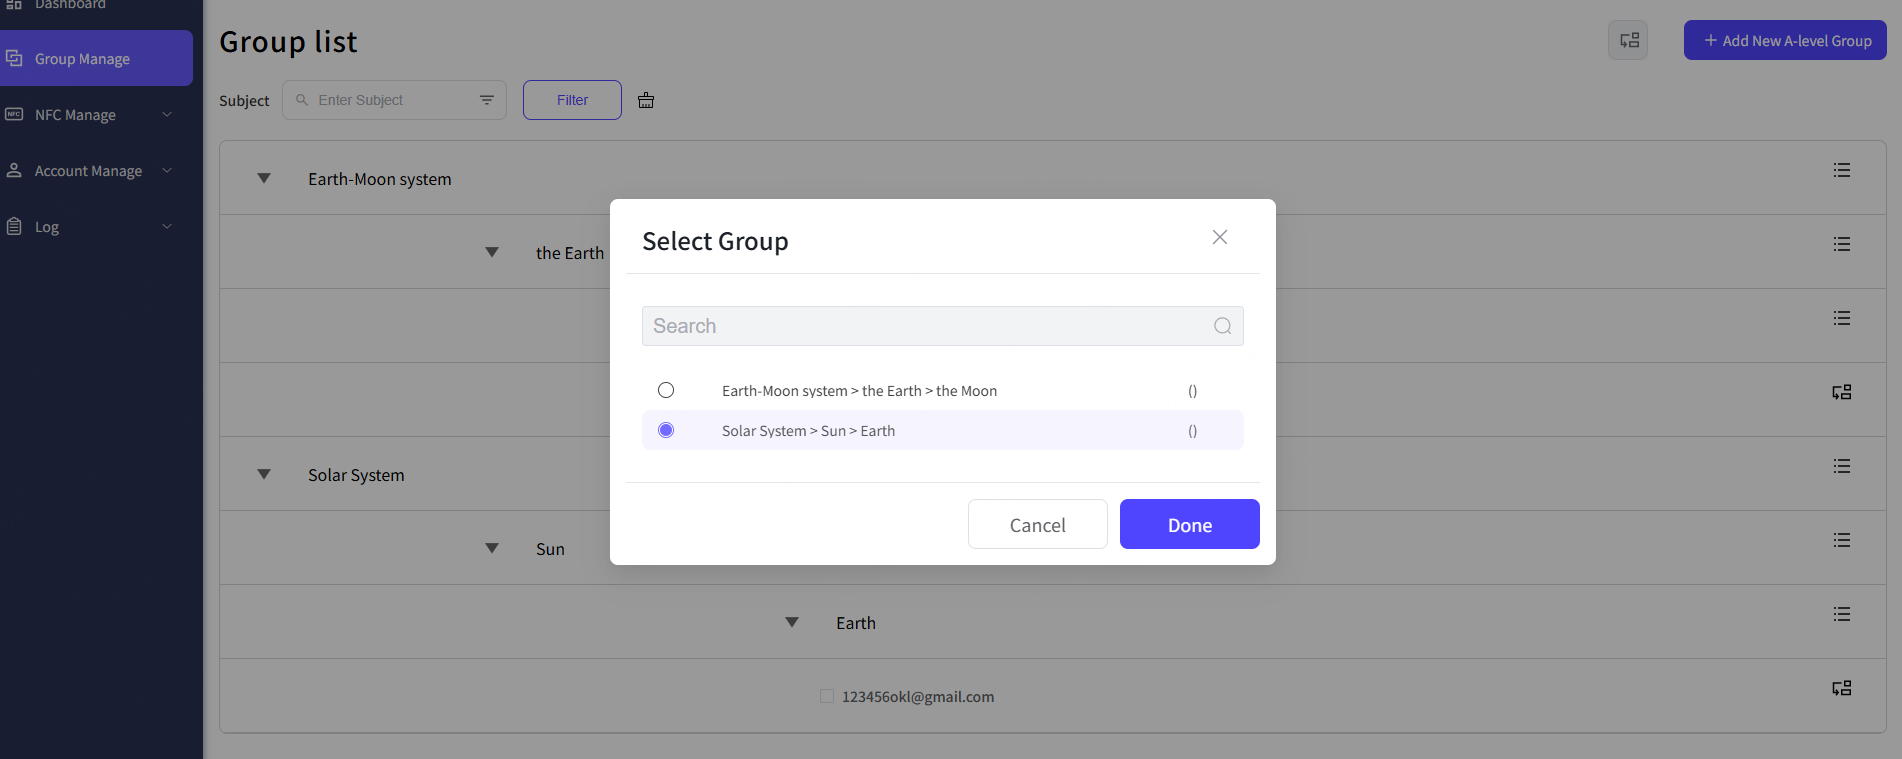
Step 5: The hint shows up, successfully switch the member account.

5.4 Other edit features
You can also use other edit features, such as remove the members, delete the group, change the line-up order.
Remove the members from the groups
Step 1: Select the member accounts from the group list.
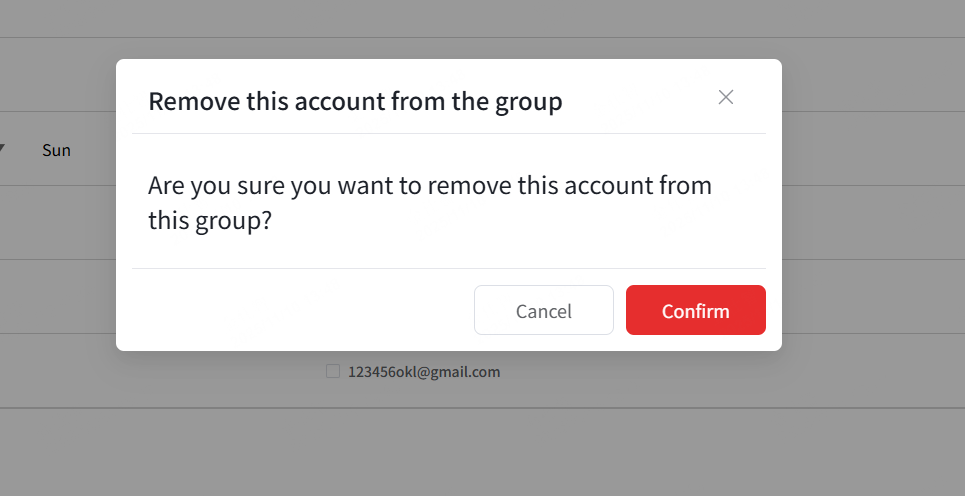
Step 2: Click the remove button.
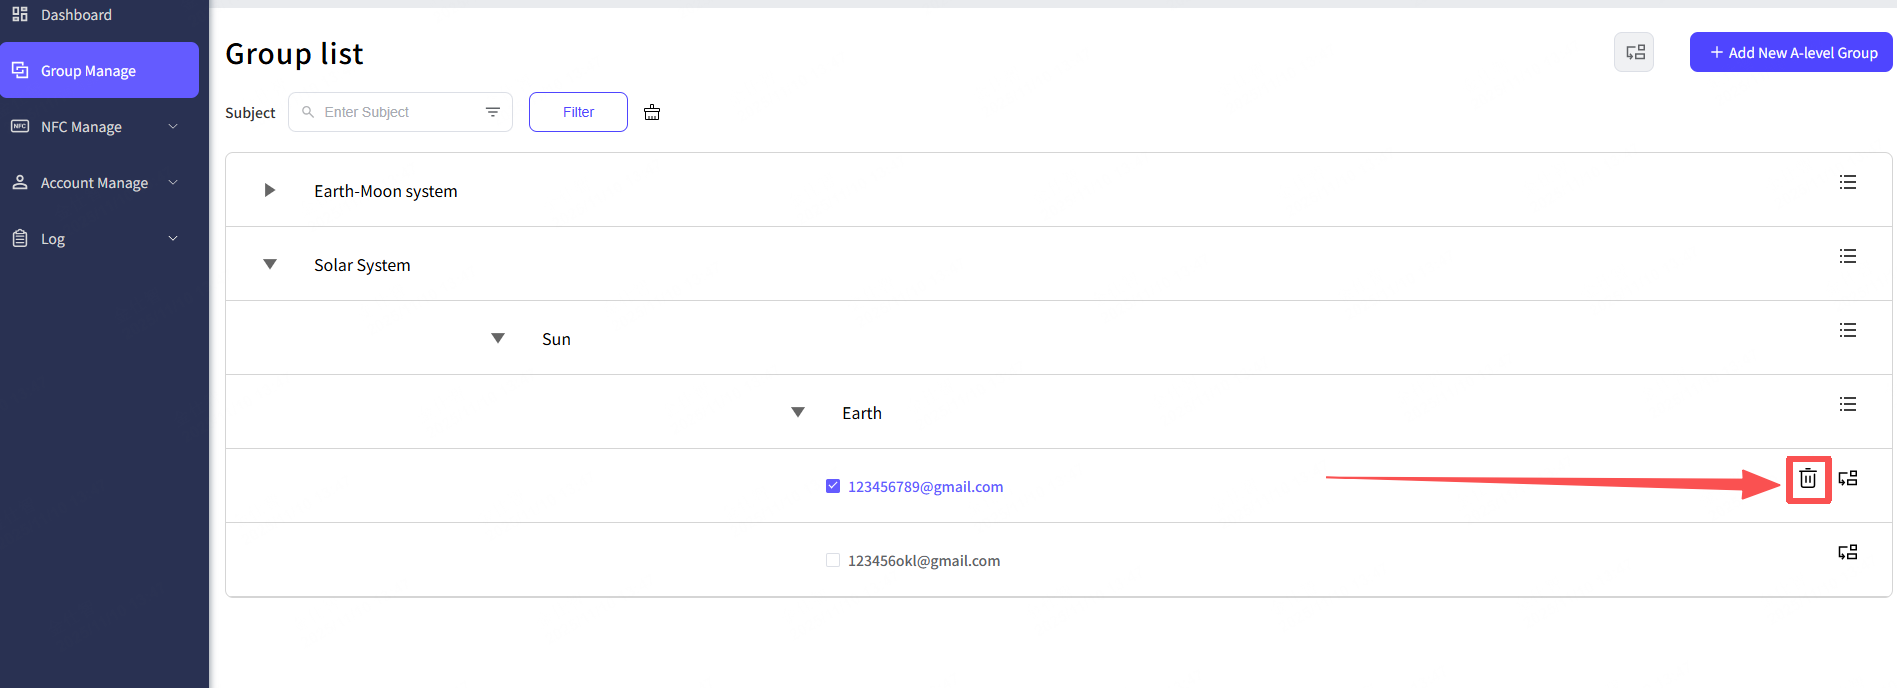
Step 3: Click the confirm button from the confirm pop-up.
Step 4: The hint shows up, successfully.
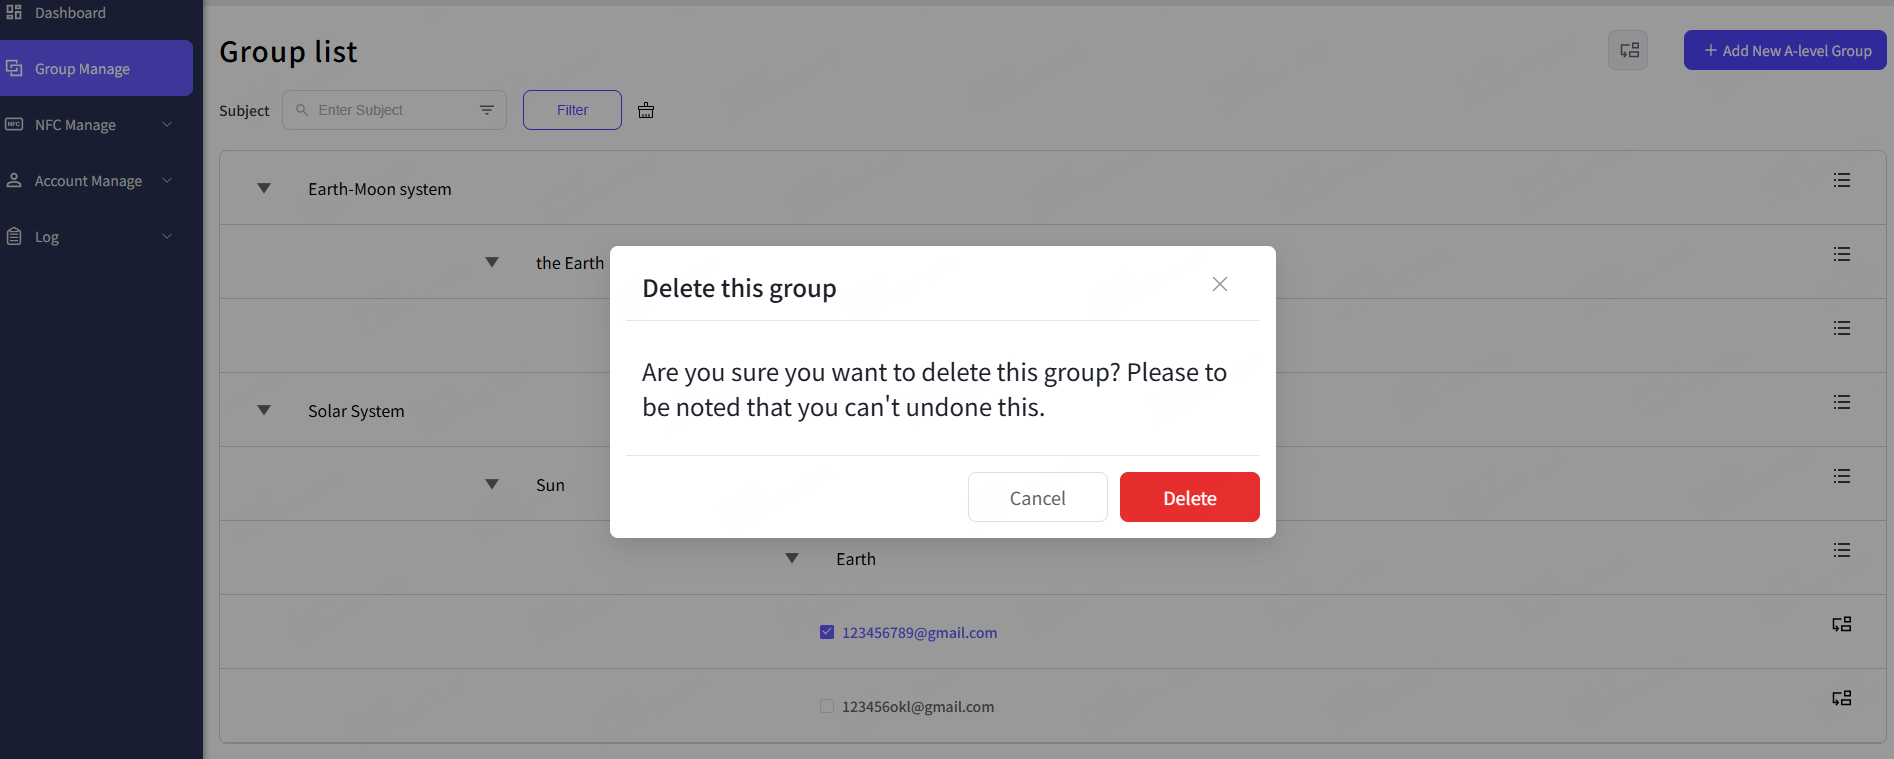
Delete the group
Step 1: Select the group that you want to delete.
Step 2: Click the delete button from the group’s edit buttons
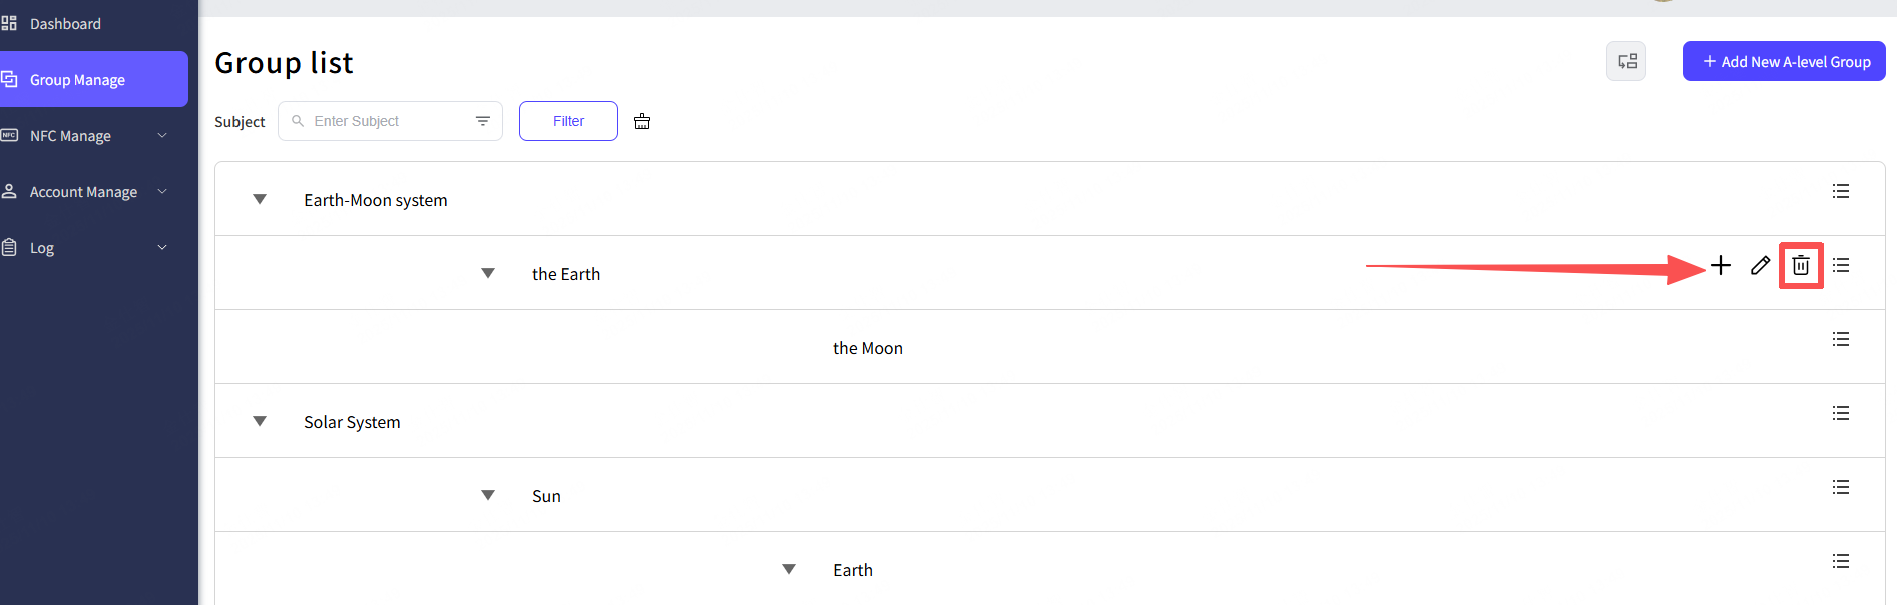
Step 3: Confirm the delete from the confirm pop-pop.
Step 4: The hint shows up, successfully delete the group, and the whole related data (such as the subset groups and the members) will be also wipe out.
Change the line-up order
Step 1: Select the group you want to change the line-up order, and then hold on the move button.
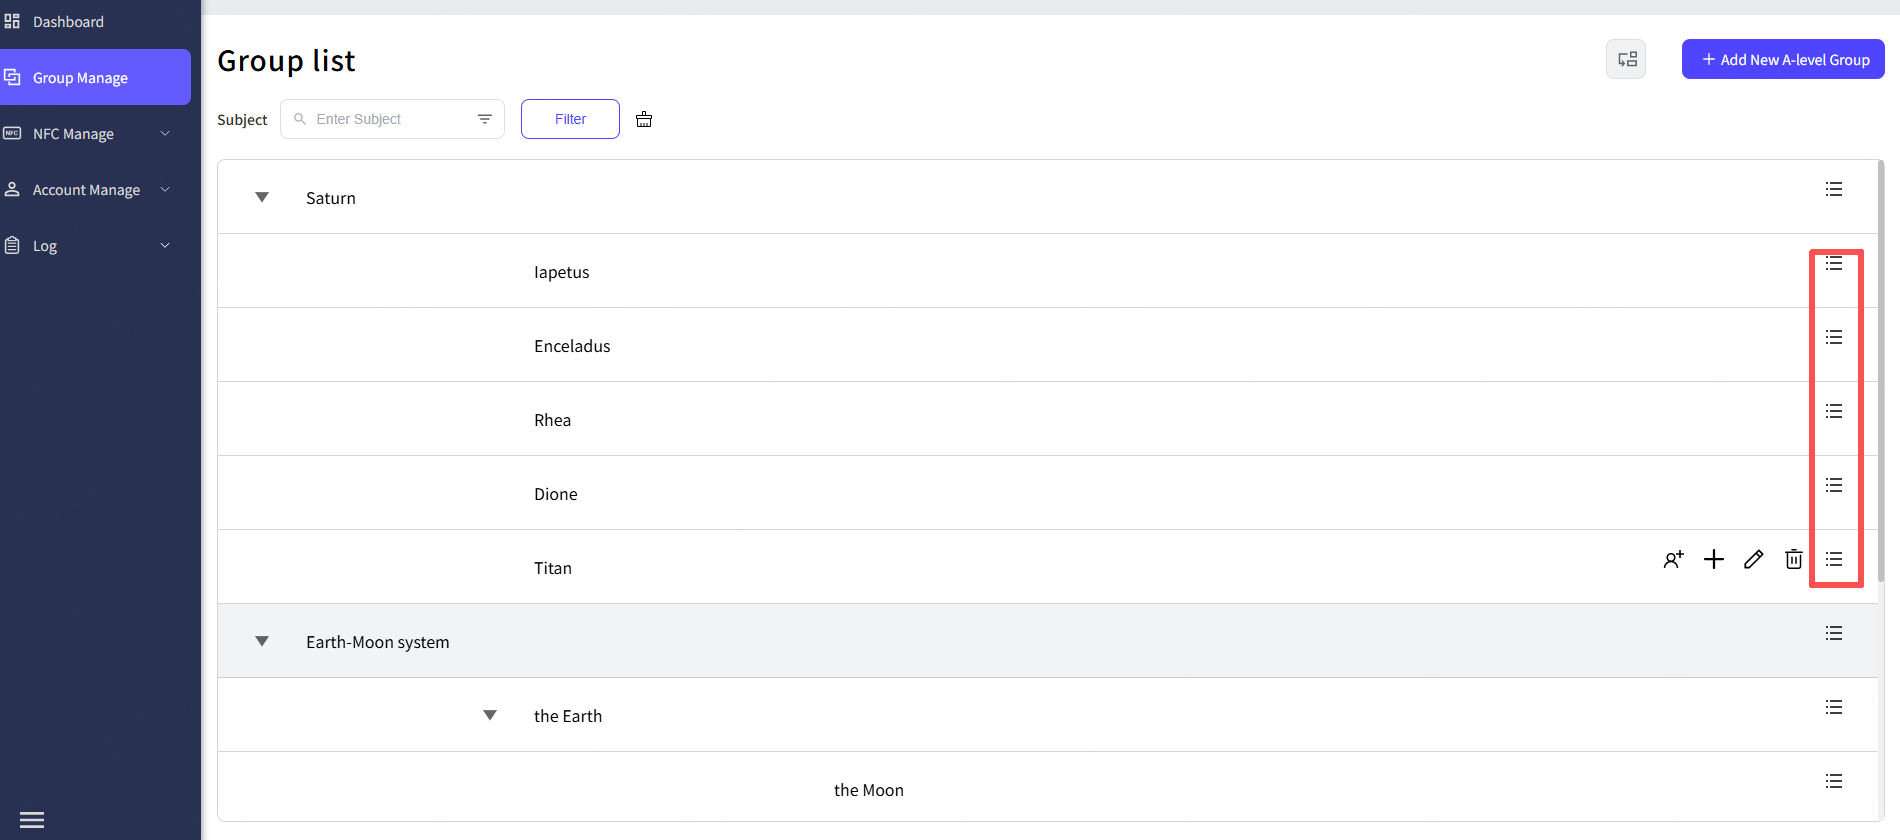
Step 2: Arrange the group in the order you want by dragging it up and down.
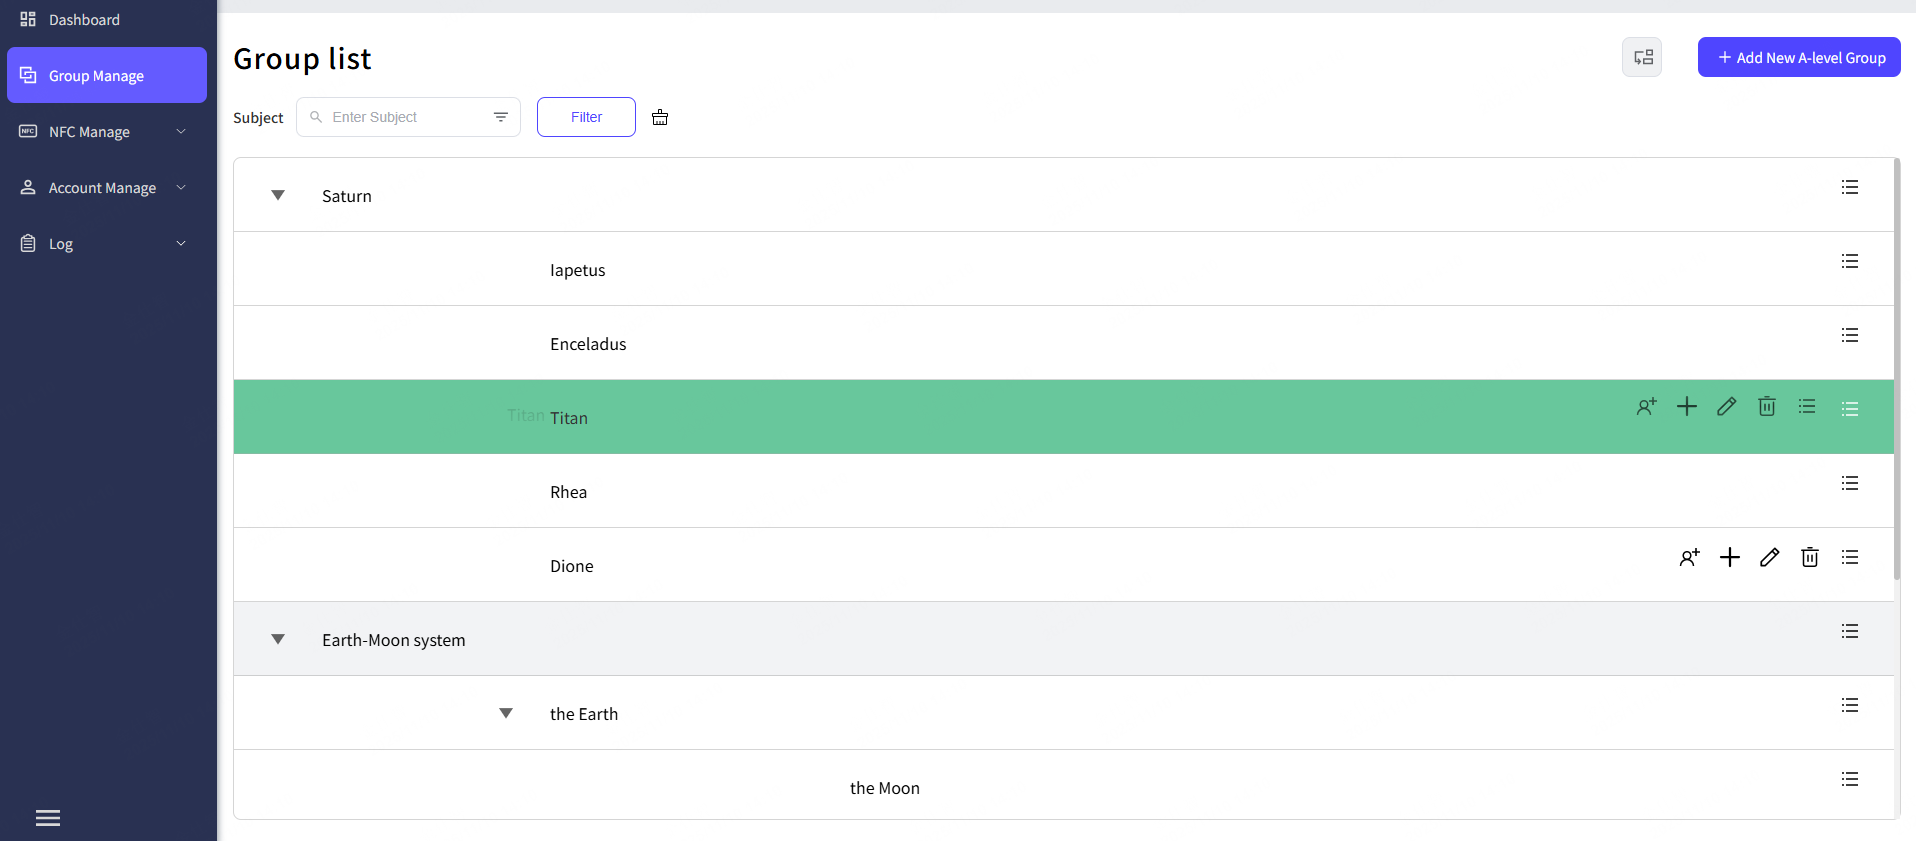
But you can only drag the same level of groups to change the line-up order. For example: A level group “Saturn” is including ten B level groups, then you can change the line-up order of the ten B level groups.
6. Log
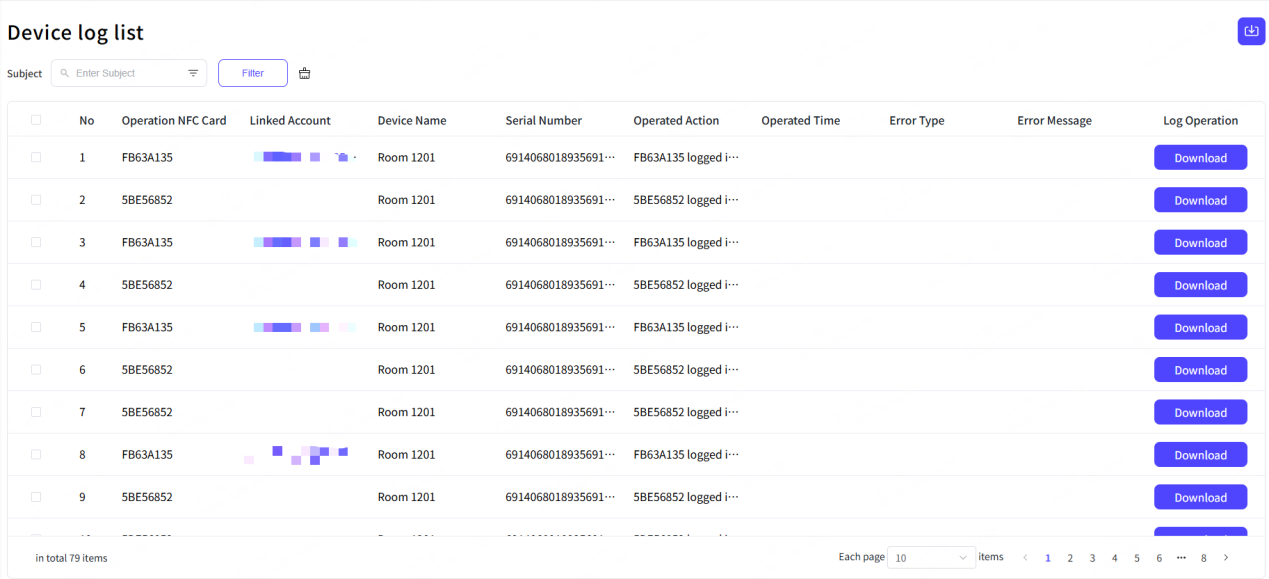
6.1 Device logs
This list records all operations related to NFC login and NFC functionality adjustments from the panel devices added to the NFC portal. It opens for log download operations. Each log entry contains information corresponding to the fields in the table.
6.2 Web logs
This list primarily records all web operation logs for each web account across the entire site and allows for log download operations. Each log entry contains information corresponding to the fields in the table.

7. Account profile
7.1 Edit account info
You can go to the account profile to change your basic account info.
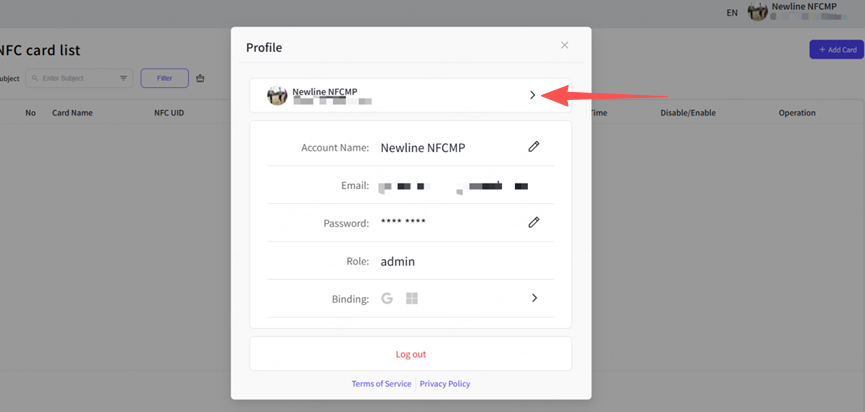
Go to the account profile
Step 1: Click the profile picture.
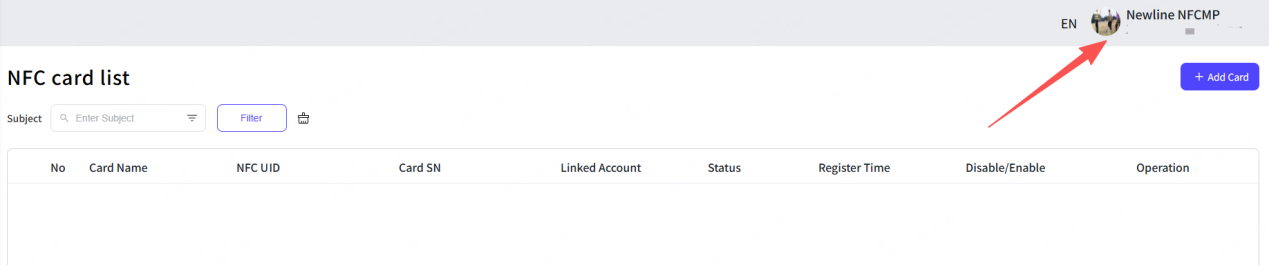
Step 2: Click the profile option.

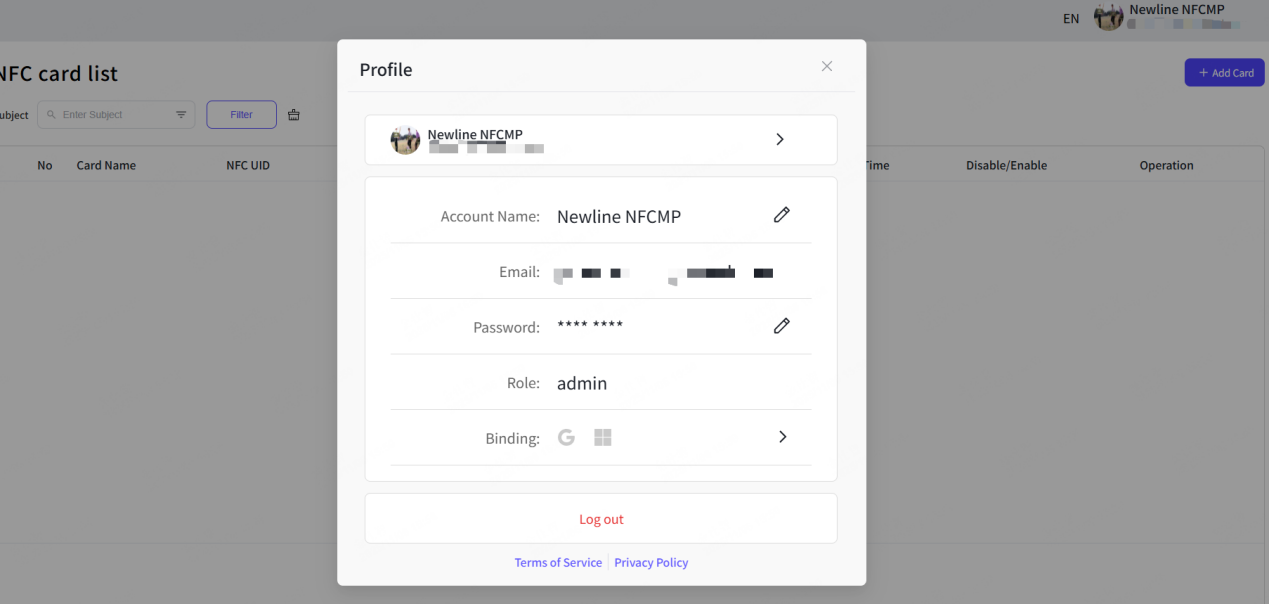
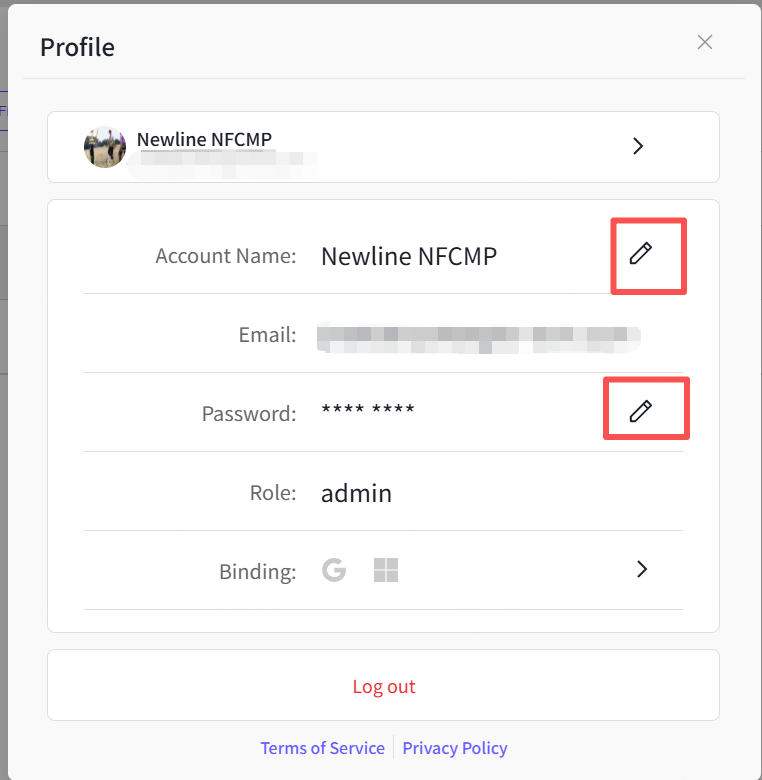
Change your account name/password
Step 1: Go to your account profile.
Step 2: Click the edit button of the account name/password.
Step 3: Type in your new name/password and confirm.
Step 4: Save it successfully.
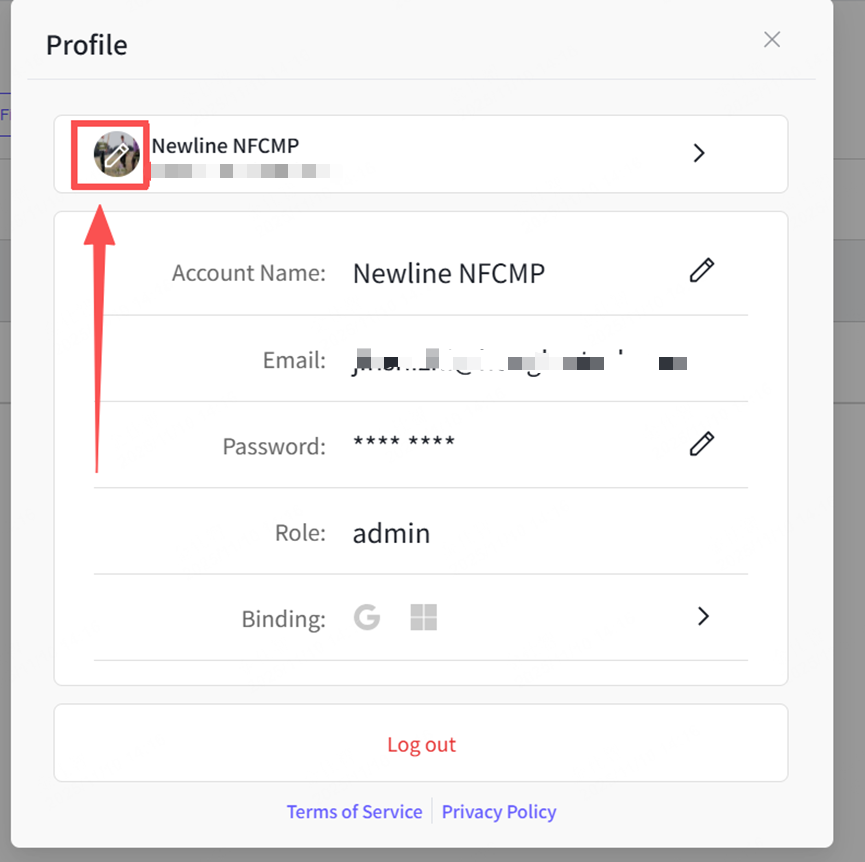
Change your profile picture
Step 1: Go to your account profile.
Step 2: Click the edit button of the profile picture.
Step 3: Select your new picture form your files and confirm.
Step 4: save it successfully.
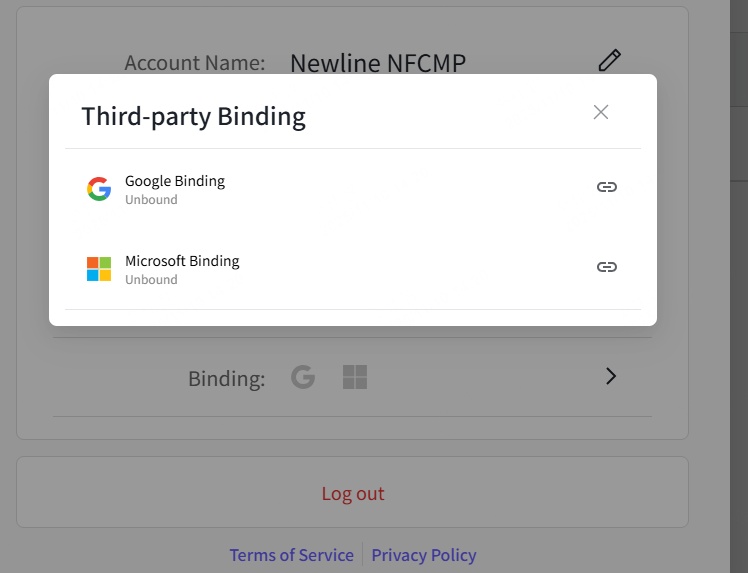
7.2 Third-party binding
Step 1: Go to your account profile.
Step 2: Click the binding option.
Step 3: choose Goole or Microsoft to connect/disconnect.
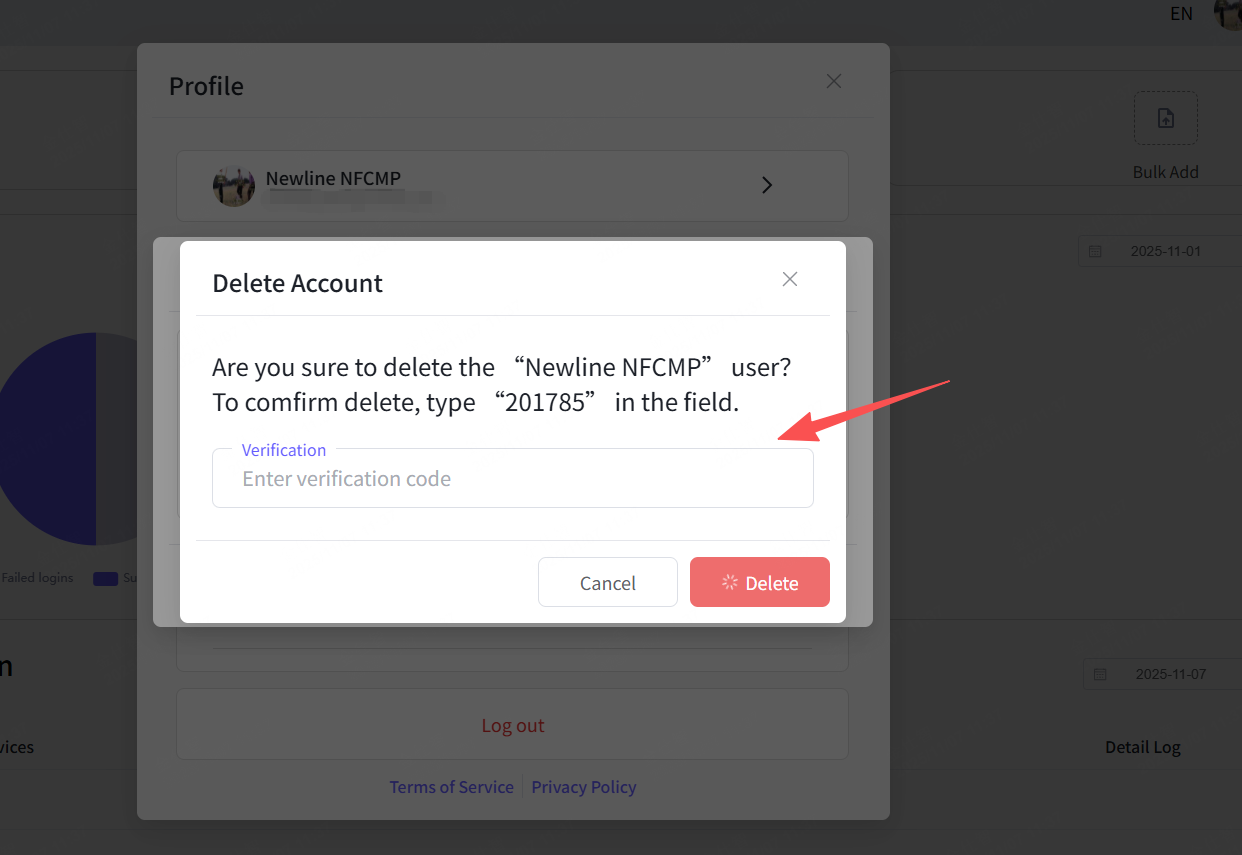
7.3 Delete Account
Step 1: Go to your account profile.
Step 2: Click the detail button of the profile.
Step 3: Click the delete button from the pop-up.
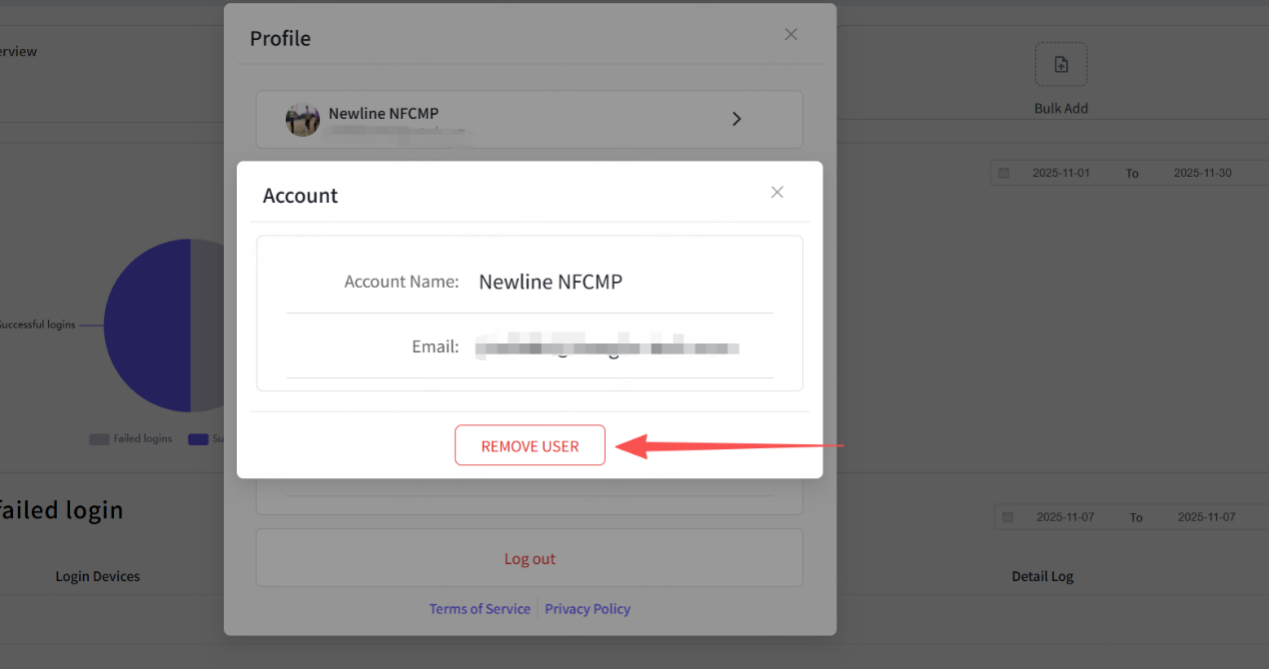
Step 4: type in the right number from the delete confirm pop-up.